Showcase Your Figma Designs on WordPress P2
Figma — one of the most popular and fastest growing digital design tools today — was recently voted “the most exciting design tool of 2021.”
In many organizations, a smaller group — often the design team — uses Figma on a daily basis. But designers need a seamless way to share their work and gather feedback from other disciplines across the organization. Enter P2. P2 is a product powered by WordPress.com that boosts remote, asynchronous team collaboration. With P2, team members can share ideas, collect feedback, and assign tasks to one another.
You can now embed Figma files on P2 and get contextual feedback from everyone, creating a more inclusive environment, eliminating the need for others to learn and navigate design-specific software.
Sharing Figma files on P2 allows teams to review designs and comment where everyone collaborates. It integrates all work in a single spot, helping track project progress. P2 is fully searchable for future reference too! As you iterate in Figma, your files will magically sync on P2. No more messy screen grabs or wondering which Figma file is the most up-to-date.
 Step 1 : Copy the link to the art board or prototype from Figma
 Step 2: Add the Figma block and paste the link into it
Get P2
Want to know more about how P2 can help improve communication and collaboration on your teams? Check out a demo. You can also create your own P2 here and take it for a spin. Any questions? Feel free to comment on the demo P2.
New Theme: Twenty Twenty One
Twenty Twenty One is the latest WordPress default theme, which is now available to all WordPress.com sites. Designed by Mel Choyce-Dwan, the muted tones and timeless design will let your work shine.

Twenty Twenty One takes advantage of all the latest features of the Block Editor — the new block patterns allow you to create a beautiful layout in seconds.
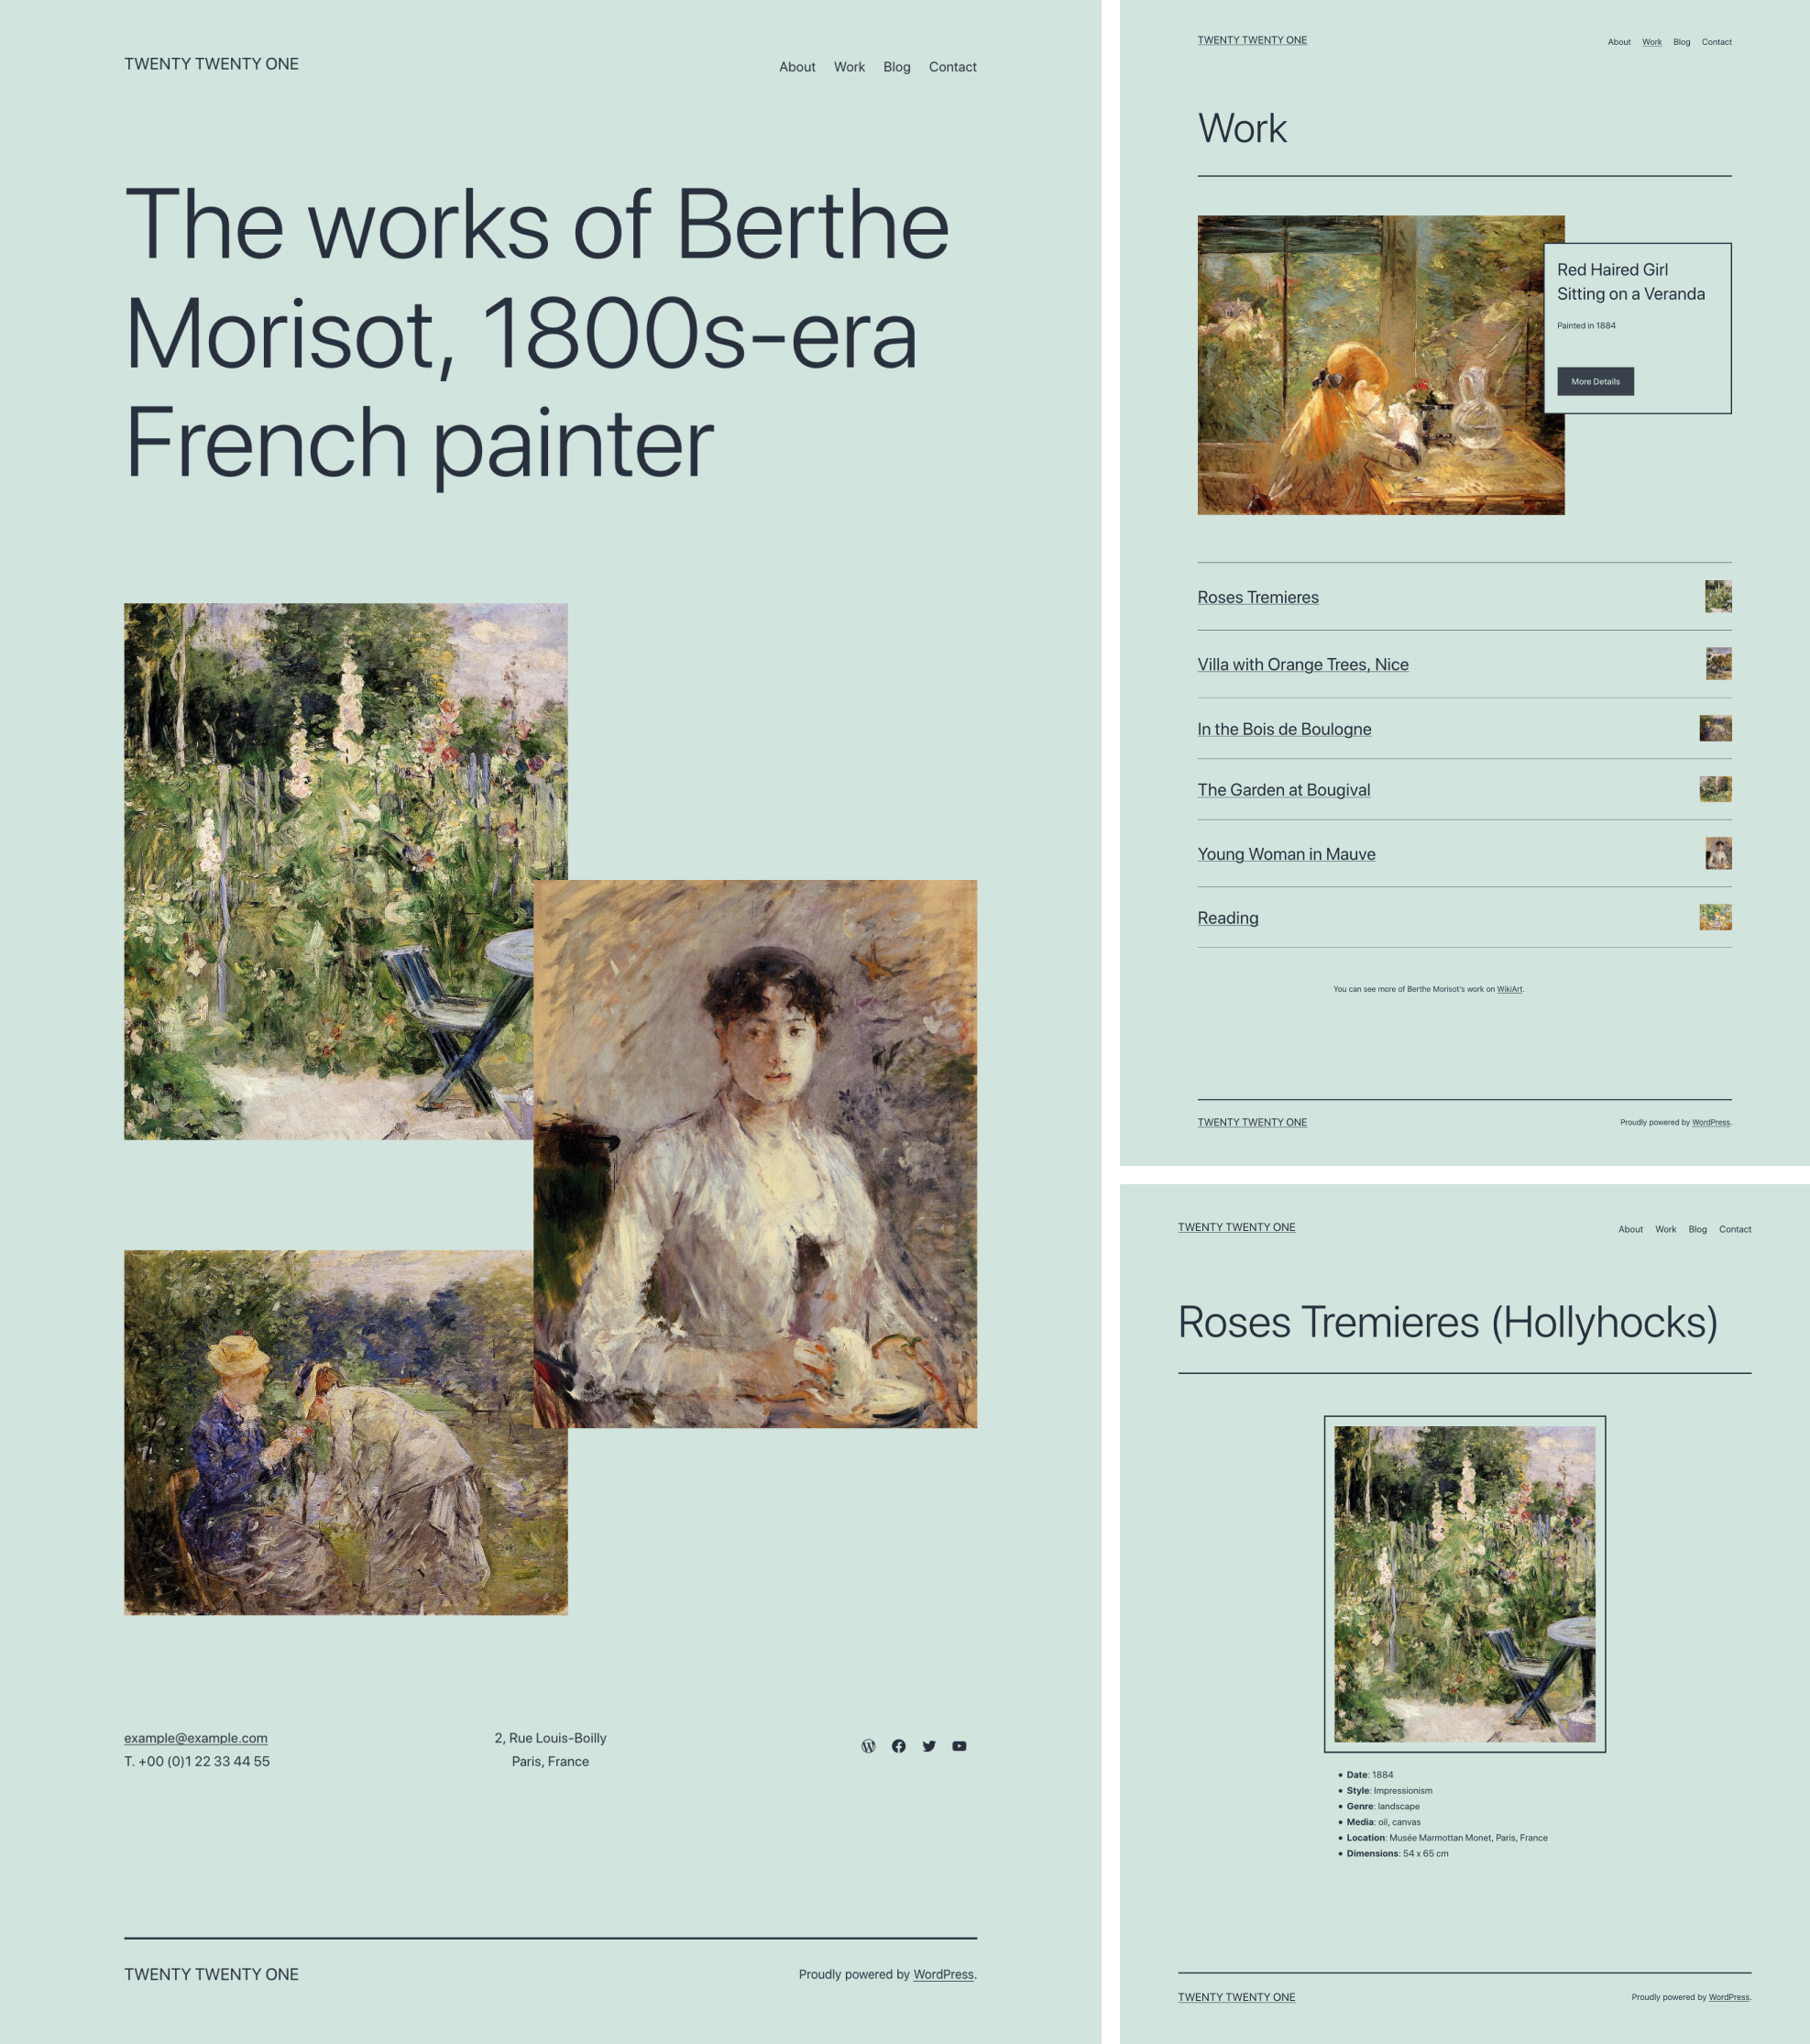
Learn more about TwentyTwentyOne, or check out the demo site!
Let Our Experts Build Your Dream Website
If one of your 2021 resolutions is to launch a business or move an existing one fully online, our WordPress.com experts can help you make it happen.
Launched in beta in the fall of 2020, our premium website building service was developed with your needs in mind. Whether you need a fast and performant eCommerce store for your products and/or services, a polished website for your professional services firm, or an educational website for your online courses, our experts can build it for you on WordPress.com, the most powerful platform for businesses and enterprises large and small.
You’ll work with a dedicated engagement manager throughout the entire project, ensuring that your vision is carried through from start to finish — freeing you to focus on the other critical parts of your business.
Interested in learning more? Fill out the brief questionnaire below, and we’ll respond within two-three business days. The questionnaire helps us learn more about your project. It doesn’t commit you to anything, but the detail you provide helps us evaluate whether the service is the right fit for your needs.
We look forward to working with you!
Earth Day Turns 50 with a Massive Livestream Event
As the world fights to bring the COVID-19 pandemic under control, another crisis looms.
In late 2018, the UN Intergovernmental Panel on Climate Change (IPCC) warned that if we want to avoid the worst impacts of climate change, we need to cut global carbon emissions almost in half by 2030. This decade will be critical.
As we’ve stated in the past, the time to act is now — we simply cannot continue business as usual, and this proves resoundingly true this year. We are in a time of maximum uncertainty and urgency.
Earth Day Live: April 22-24
Earth Day Live is a three-day livestream and an epic community mobilization to show support for our planet, through which millions of people can tune in online alongside activists, celebrities, musicians, and more. The massive live event — which starts on April 22 and concludes on April 24 — is organized by climate, environmental, and Indigenous groups within the US Climate Strike Coalition and Stop The Money Pipeline Coalition.
Starting today, you can opt into displaying a banner that promotes Earth Day Live on your WordPress.com site, showing your commitment to this critical topic and spreading the word about the digital event and livestream. On April 22, sites with this feature enabled will automatically display a full-screen overlay message. Your site visitors will be able to dismiss the banner once viewed.

Promote this global movement on your site
To activate the banner, go to My Site → Manage → Settings. At the top of the Settings menu, you will see a toggle switch — flip it on to join this digital climate strike.

Self-hosted WordPress sites can also join the movement by installing the Earth Day Live WP plugin from the WordPress.org plugin repository.
After the livestream ends, the banner will disappear on its own — no further action is required on your end. (If you’ve installed the plugin, it will automatically disable.)
Together we can make a difference. We hope you’ll join us in supporting this movement.
Visit Earth Day Live for event details, and explore more digital Earth Day initiatives and resources on WordPress so you can take action on April 22 — or any day.
Expert Advice: Get Started on Your New Website
Starting a new website can be a bit overwhelming but we’re here to help! Beginning Monday, April 20th, WordPress.com will host free, 30-minute live webinars to cover those initial questions that come up as you start to build your website. Each day will cover a different topic, all designed to give actionable advice on how to create the type of website you want.
Date: Starts April 20, 2020 and repeats daily Monday thru Friday
Weekly Schedule:
- Mondays – Getting Started: Website Building 101
- Tuesdays – Quick Start: Payments (Simple and Recurring)
- Wednesdays – Quick Start: Blogging
- Thursdays – Quick Start: WooCommerce 101
- Fridays – Empezando: Construcción de Sitios Web 101
Time: 09:00 am PDT | 10:00 am CDT | 12:00 pm EDT | 16:00 UTC
Who’s Invited: New WordPress.com users and anyone interested in learning more about WordPress.com’s website capabilities.
Register Here: https://wordpress.com/webinars/
Our WordPress.com customer service team, we call them Happiness Engineers, are experts in helping new users get up and running on their new websites. Across each week of webinars we’ll cover questions about the basics of setting up your website, handling simple and recurring payments, blogging best practices, and adding in eCommerce capabilities. Come with questions as you’ll be able to submit them beforehand—in the registration form—and during the live webinar.
Everyone is welcome, even if you already have a site set up. We know you’re busy, so if you can’t make the live event, you’ll be able to watch a recording of the webinar on our YouTube channel.
Live attendance is limited, so be sure to register early. We look forward to seeing you on the webinar!
Expert Advice: How to Start Selling on Your Website
Are you just taking your first steps selling a product or service online and don’t know where to begin? Be sure to register for our next 60-minute, free webinar, where our expert Happiness Engineers will walk you through the basics of eCommerce and show you how to set up your online store.
Date: Thursday, April 16, 2020
Time: 5 p.m. UTC | 1 p.m. EDT | 12 p.m. CDT | 10 a.m. PDT
Cost: Free
Who’s invited: business owners, entrepreneurs, freelancers, service providers, store owners, and anyone else who wants to sell a product or service online.
Registration link
Hosts Steve Dixon and Maddie Flynn are both veteran Happiness Engineers with years of experience helping business owners and hobbyists build and launch their eCommerce stores. They will provide step-by-step instructions on setting up:
- Simple Payments — perfect for selling a single product or service.
- Recurring Payments — great for subscriptions and donations.
- WooCommerce — ideal for entrepreneurs who want to build an online store and automate sales.
No previous eCommerce experience is necessary, but we recommend a basic familiarity with WordPress.com to ensure you can make the most from the webinar. The presentation will conclude with a Q&A session (15-20 minutes), so you can already note down any questions you might have and bring them with you to the webinar.
Seats are limited, so register now to reserve your spot. See you then!
Import Your WordPress Site to WordPress.com — Including Themes and Plugins
It’s been possible to export your posts, images, and other content to an export file, and then transfer this content into another WordPress site since the early days of WordPress.
 Select WordPress from the list of options to import your site.
This basic WordPress import moved content, but didn’t include other important stuff like themes, plugins, users, or settings. Your imported site would have the same pages, posts, and images (great!) but look and work very differently from the way you or your users expect (less great).
There’s a reason that was written in the past tense: WordPress.com customers can now copy over everything from a self-hosted WordPress site — including themes and plugins — and create a carbon copy on WordPress.com. You’ll be able to enjoy all the features of your existing site, plus the benefits of our fast, secure hosting with tons of features, and our world-class customer service.
 Select “Everything” to import your entire WordPress site to WordPress.com.
To prep for your import, sign up for a WordPress.com account — if you’d like to import themes and plugins, be sure to select the Business or eCommerce plan — and install Jetpack (for free) on your self-hosted site to link it to WordPress.com. To start the actual import, head to Tools → Import in your WordPress.com dashboard.

Then, sit back and relax while we take care of moving your old site to a new sunny spot at WordPress.com. We’ll let you know when it’s ready to roll!
Make Your Business More Accessible with New Blocks
From our support sessions with customers each month, we know that growing your brand or business is a top website goal. And in this unprecedented time in which more people around the world are staying at home, it’s important to promote your products and services online to reach a wider audience and connect with more people.
Our team has been hard at work improving the block editor experience. We’ve launched six new blocks that integrate WordPress.com and Jetpack-enabled sites with popular services — Eventbrite, Calendly, Pinterest, Mapbox, Google Calendar, and OpenTable — enabling you to embed rich content and provide booking and scheduling options right on your blog or website.
Whether you’re an online boutique, a pilates studio, an independent consultant, or a local restaurant, these blocks offer you more ways to promote your brand or business. Take a look at each block — or simply jump to a specific one below.
Promote online events with the Eventbrite block
Looking for a way to promote an online event (like your museum’s virtual curator talk or your company’s webinar on remote work), or even an at-home livestream performance for your fans and followers? Offering key features of the popular event registration platform, the Eventbrite block embeds events on posts and pages so your visitors can register and purchase tickets right from your site.

Quick-start guide:
- To use this block, you need an Eventbrite account. If you don’t have one, sign up at Eventbrite for free.
- In the block editor, click the Add Block (+) button and search for and select the Eventbrite Checkout block.
- Enter the URL of your Eventbrite event. Read these steps from Eventbrite if you need help.
- Select from two options: an In-page Embed shows the event details and registration options directly on your site. The Button & Modal option shows just a button; when clicked, the event details will pop up so your visitor can register.

Learn more on the Eventbrite block support page.
Schedule sessions with the Calendly block
Want to make it easier for people to book private meditation sessions or language lessons with you? The Calendly block, featured recently in our guide on moving your classes online, is a handy way for your clients and students to book a session directly on your site — eliminating the time spent coordinating schedules. You can also use the Calendly block to schedule team meetings or group events.

Quick-start guide:
- To use this block, you need a Calendly account. Create one for free at Calendly.
- In the block editor, click the Add Block (+) button and search for and select the Calendly block.
- Enter your Calendly web address or embed code. Follow these steps from Calendly if you need help.
- Select from two styles: the Inline style embeds a calendar directly onto your site; the Link style inserts a button that a visitor can click to open a pop-up calendar.
- This block is currently available to sites on the WordPress.com Premium, Business, or eCommerce plans. It’s free on Jetpack sites.

Learn more on the Calendly block support page.
Up your visual game with the Pinterest block
Strong visuals help to provide inspiration, tell your stories, and sell your products and services. Pinterest is an engaging way for bloggers, influencers, and small business owners to enhance their site content and expand their following. With the Pinterest block, you can embed and share pins, boards, and profiles on your site.

Quick-start guide:
- In the block editor, click the Add Block (+) button and search for and select the Pinterest block.
- Paste the URL of a pin, board, or profile you’d like to display and click Embed. Note that you can only embed public boards.
- Pro tip: in the block editor, go to Layout Elements and select Layout Grid to create a visually striking layout with pins, boards, and profiles, as shown above.
Display locations with the Map block
A map on your site is a quick visual way to display a location, like your restaurant’s takeout window or the drop-off spot for donations to a local food bank. Powered by mapping platform Mapbox, the Map block embeds a customized map on your site. Show the location of your business, a chain of boutique hotels, the meeting spots for your nonprofit’s volunteers, and more.

Quick-start guide:
- In the block editor, click the Add Block (+) button and search for and select the Map block.
- In the text field, type the location you want to display and select the correct location from among the results that appear.
- Click on the red marker to edit the title and caption of the marker.
- Explore the toolbar for block-specific settings. Add more markers, for example, by clicking the Add a marker button.
- In the sidebar, customize your map’s appearance (including colors, height, and zoom level).
Explore more settings on the Map block support page.
Share your calendar with the Google Calendar block
Are you an author planning a book tour (or a series of online readings)? A digital marketing consultant hosting social media workshops? A neighborhood pop-up bakery? With the Google Calendar block, you can display a calendar of upcoming events or your hours of operation.

Quick-start guide:
- In Google Calendar, click the three dots next to your calendar name and select Settings and sharing.
- Under Access Permissions, ensure Make available to public is checked.
- Click on Integrate calendar on the left and copy the code under Embed code.
- In the block editor, click the Add Block (+) button, search for and select the Custom HTML block, and paste the code you copied in Google Calendar.
- Publish your post or page. The next time you edit this post or page, you’ll see the code has been converted to shortcode.
Explore more settings on the Google Calendar block support page.
Streamline reservations with the OpenTable block
If you’re a restaurant or cafe owner, a primary goal of your site is to increase the number of bookings. Sure, people aren’t dining out right now, but you can be ready to take reservations in the future. With the OpenTable block, people can reserve a table directly from a post or page instead of calling or booking through a different reservation service.

Quick-start guide:
- To use this block, your restaurant must be listed on OpenTable. Create an OpenTable listing now.
- In the block editor, click the Add Block (+) button and search for and select the OpenTable block.
- Enter your OpenTable Reservation Widget embed code. Check this OpenTable guide if you need help.
- Explore the block’s toolbar and sidebar settings. For example, choose from four different embed styles: Standard, Tall, Wide, and Button.
- This block is currently available to sites on the WordPress.com Premium, Business, or eCommerce plans. It’s free on Jetpack sites.

Learn more on the OpenTable block support page.
Which blocks are you most excited about?
Stay tuned for more new blocks soon!
Create With Confidence — and Better Blocks
In the last few years, the teams working on the block editor have learned a lot about how people build sites now and how they want to build sites in the future.
The latest version represents the culmination of these discoveries, and the next stage in the editor’s evolution.
With better visuals and more advanced features, it’ll keep designers, developers, writers, and editors productive and happy, and — tension-building drumroll — it’s in your editor right now!
What’s new
With a comprehensive visual refresh, a plethora of new features, and dozens of bug fixes, the new block editor comes with a lot to unpack.
What follows is just a small (but delectable) sample of the many ways we’ve upgraded your editing experience. (You can get the full list of goodies in the release notes.)
We hope you enjoy.
A revamped editor UI
The first thing you’ll notice is the slick UI. Buttons, icons, text, and dropdowns are all sporting a contrast boost, with bolder colors and more whitespace between buttons, text labels, and menu items.
 The new block editor’s UI
As you navigate through the editor’s menus, individual items are clearly highlighted, allowing you to quickly identify what you’ve selected.
 Active menu items have distinct highlights
The block toolbars are now simpler, displaying the most commonly-used features. For example, paragraph blocks show only bold, italic, and link formatting buttons. You’ll find all the extra options in the dropdown menu.
 The block toolbar options are simpler and uncluttered
What’s more, instead of listing blocks within a fixed-height container, the block inserter now spans the height of the window. You’ll now see more blocks and block categories at once with less scrolling.
 The block inserter spans the full height of your screen
Introducing block patterns
With the block editor as your canvas you can design almost any layout you can imagine – but building intricate page structures should never get in the way of your creative process.
Here’s where the blocks really shine: along with individual blocks, the editor now includes block patterns, a library of predefined and reusable block layouts, that you use on any page or post.
To check out the list of available patterns, click on the block pattern icon (on the top right) to reveal a collection of pre-built layouts:
 Block patterns are groups of individual blocks combined to create elegant layouts
Pick the pattern you want to use, and it will appear in your editor ready for you to customize with your own content.
Right now, you’ll find a few introductory patterns – Two Columns of Text, Two Buttons, Cover, and Two Images Side by Side – but we’ll be adding more and more patterns as they’re available. When the block patterns API opens up to third-party authors, you’ll also be able to develop and share your own.
(Have an idea for a great pattern? The block editor developer community is actively seeking ideas. The more ideas they receive, the better your editor will be!)
Colors, colors everywhere
When it comes to words and columns, websites aren’t newspapers: things don’t have to be black and white.
Use the new Text Color selector tool to change the color of sentences, and even individual words and letters. Highlight the text you’d like to change, then click on the arrow dropdown and select “Text Color.”
 Select “Text Color” from the options
 Pick the color of your word or character
To change the background colors of your columns, select the column and head to the sidebar, to Color settings.
 Columns get background colors too!
The road ahead is paved with blocks
There’s still a long way to go, and the editor’s community of contributors hasn’t given its collective keyboards a moment’s rest. Work on polishing UI elements like the sidebar and dropdowns continues along with advancements to block patterns and other exciting features.
Are there ways we could improve the site editing experience even more? Please let us know! We’re always keen to hear how we can make the web a better place for everyone.
How to Move Your Classes Online — and Charge for Them
We are proud to host many websites for language tutors, yoga schools, and personal fitness coaches around the world.
It’s exciting to see how educators and consultants across different industries are getting creative with their online offerings: language teachers conduct 1:1 sessions to help students hone pronunciation, yoga studios livestream group sessions, and instructors lead writing boot camps via Zoom breakout rooms. Even my own strength coach is monitoring my workouts — I launch the camera on my phone, place it against the wall, and do deadlifts while he supervises.
Last year we launched Recurring Payments to support creators, consultants, small businesses, and other professionals in establishing dependable income streams. We were very pleased to discover that online educators using this feature are thriving as well!
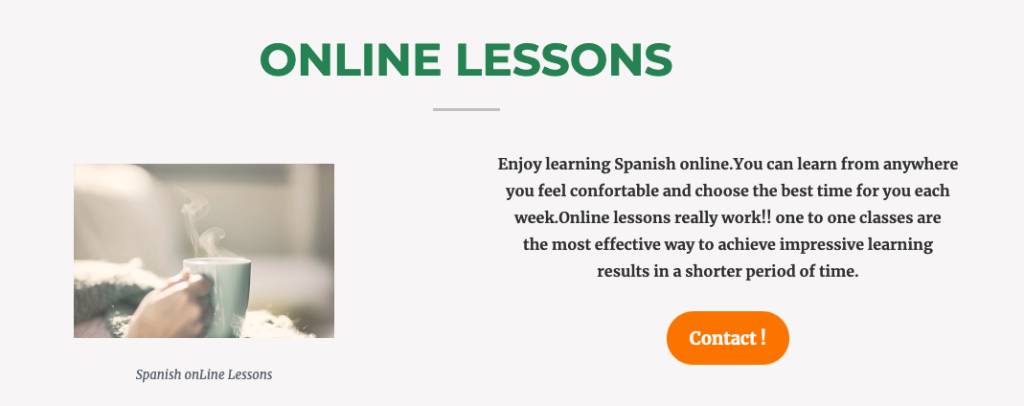
Marta, for example, runs Spanish Teacher Barcelona, a Spanish language school located in — you guessed it! — Barcelona. She offers 1:1 sessions and classes in a coworking space in the city’s Gracia neighborhood. For customers that cannot meet in person, she hosts private lessons online, available with a subscription. She offers three subscription plans to meet the variety of needs of her students.
Ready to set up your own subscription-based service or move your existing classes online? Here’s a quick guide to get you set up with the right tools, so you can focus instead on providing the best educational environment possible.
Set up your online class today
Below, we’ll cover the steps you can take to get your classes or private lessons up and running with the Recurring Payments feature. We’ll also recommend tools to make scheduling 1:1 sessions and operating your classes easier, like the Calendly block and various video conferencing tools.
1. Create a “Subscribe” page to promote your class or service
You need to convince your customers that your subscription is worth paying for. A typical way to do this is with a “Subscribe” page where you explain the benefits of your services.
Take a look at the “Join” page on Longreads.com, an online publication that publishes and curates nonfiction storytelling on the web and funds stories with memberships:

A few tips to make your offer irresistible:
- Focus on the benefits for the customer.
- Provide a few subscription options, such as classes at different frequencies and at different price points.
- Add testimonials if you can — people love to read reviews.
Create this page by going to My Sites → Pages → Add New.
2. Add a subscription with the Recurring Payments feature
Recurring Payments allows you to create renewable payments. Your subscribers will enter their credit card details, and will then be charged automatically every month or every year.
Recurring Payments is currently available on any of our paid plans. To get started, you’ll need to create a Stripe account, which is a global money transfer service. We partner with Stripe to make sure payments end up safely in your bank account.
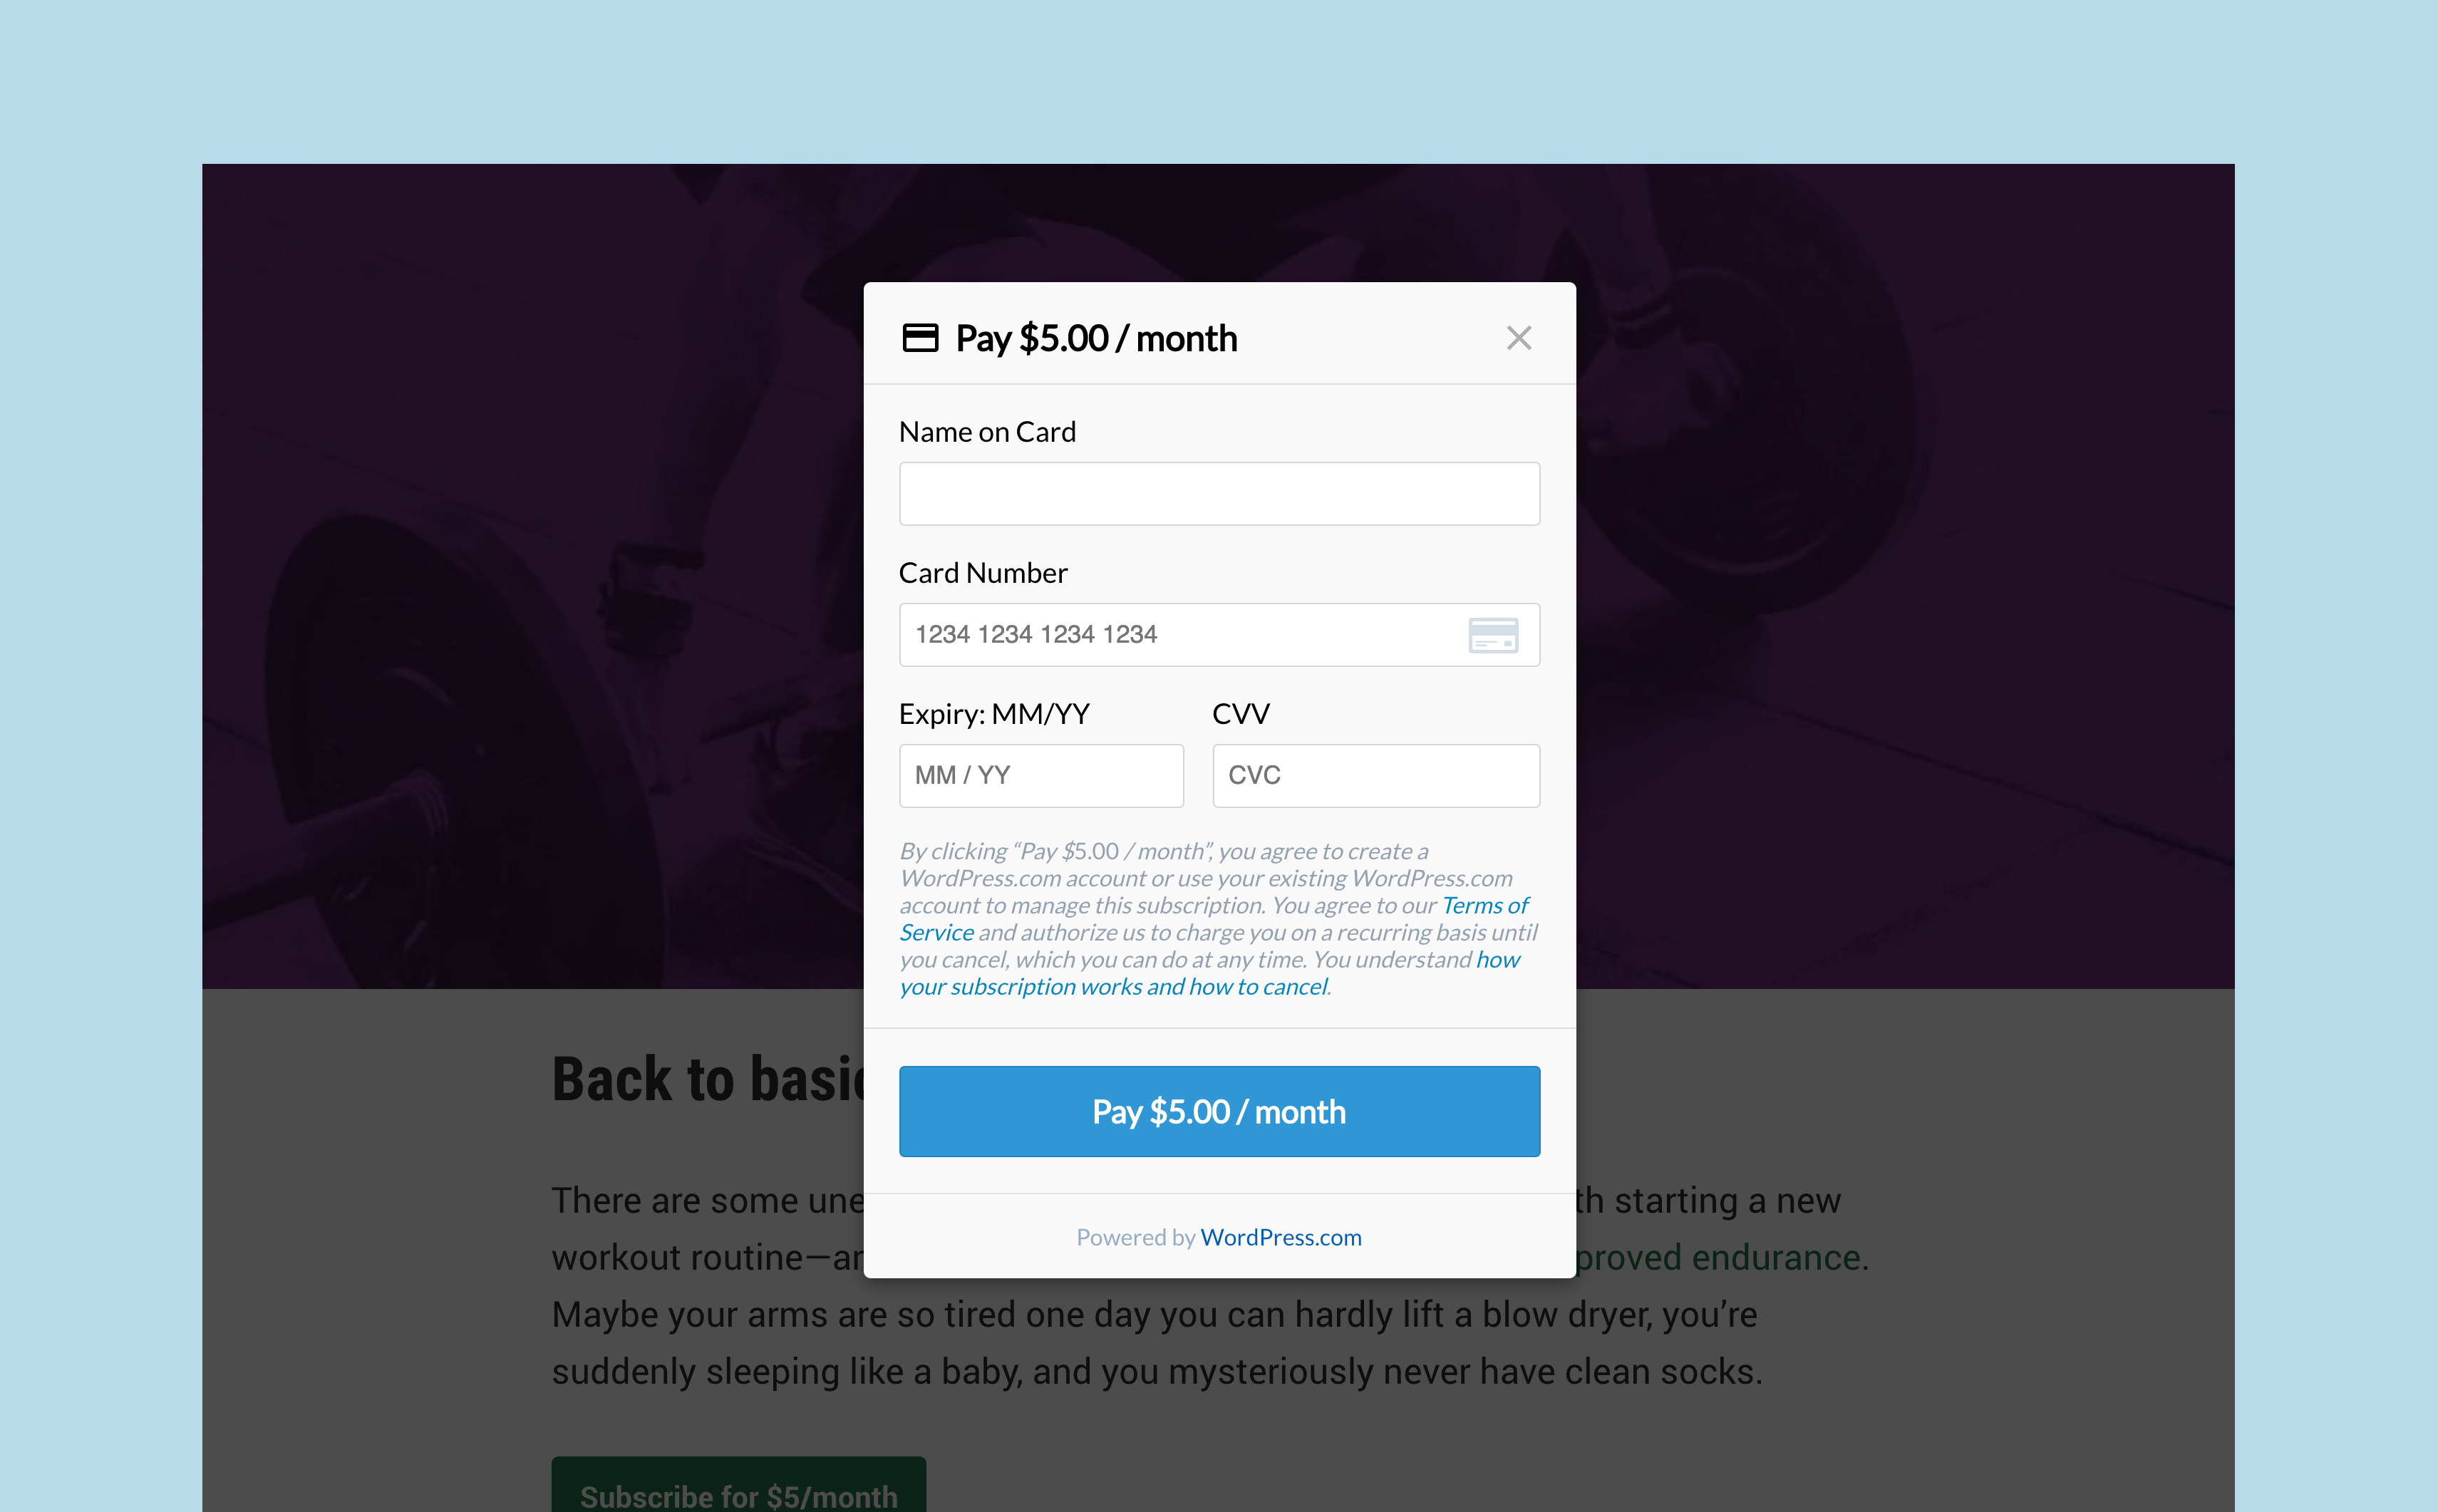
You can start collecting Recurring Payments in five minutes.
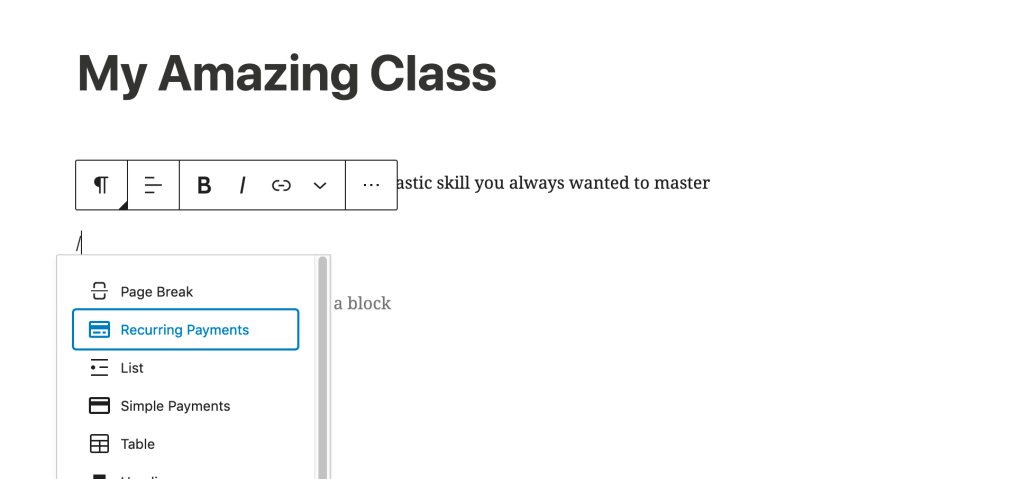
On the “Subscribe” page you created above, search for the “Recurring Payments” block:
After clicking “Connect to Stripe,” you’ll be able to connect your existing Stripe account or create a new one.
Now you can create your first subscription.
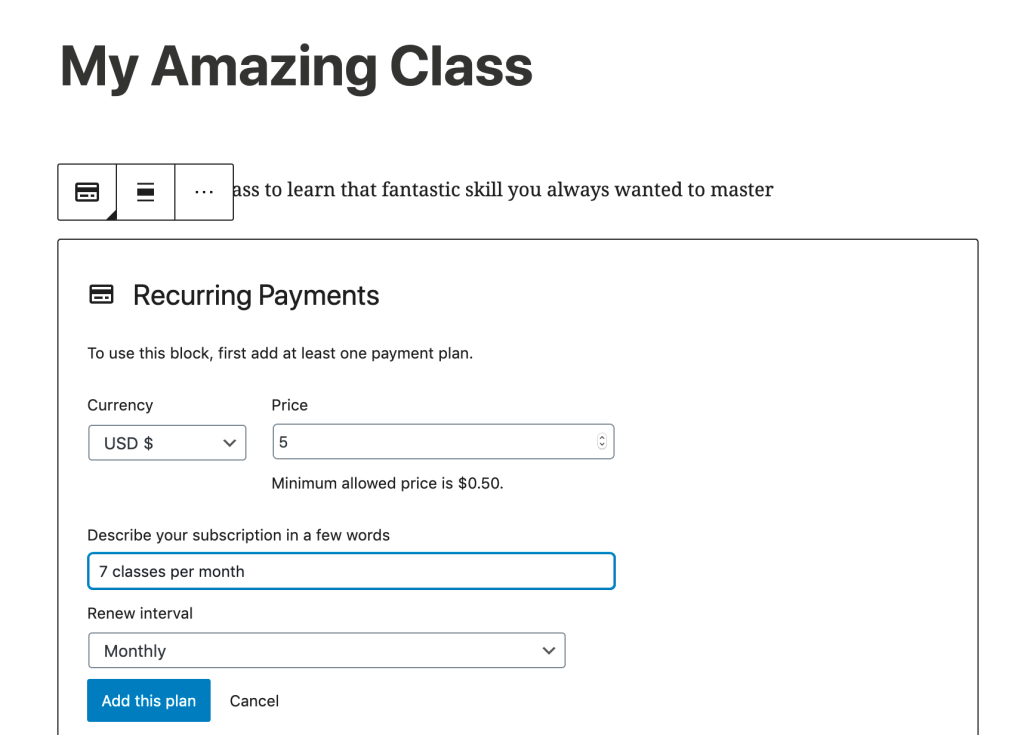
Set the price, frequency (we recommend monthly for start), and the title of your subscription, like Writing Bootcamp, 3 breakout sessions/month or Conversational French for Beginners, 4 classes/month.
That’s it! Your subscription is now created. Once you publish the page and activate your Stripe account, your customers will be able to subscribe to this service.
Subscriptions are dependable: your subscribers will be automatically charged at the beginning of the next renewal period (in a month or a year). You don’t have to remind or nudge them, and they also don’t have to remember to pay you — everything is handled.
For more details, please read this Recurring Payments support article.
Would you rather sell access to your services as a one-time purchase? Check out the Simple Payments feature.
3. Schedule your lessons
Your subscribers can set up a time for their lessons using a service like Calendly, a handy tool that allows them to select a free slot in your schedule. We recently created the Calendly block to bring some of the service’s key features to you. While editing your page, search for the “Calendly” block.

Remember to check if the subscription is active
Before hopping on an online meeting, you need to confirm that the person scheduling a call is indeed a paying subscriber. Check the list of your active Recurring Payments subscribers located in your WordPress.com dashboard under My Sites → Earn → Payments.
4. Select a tool to host your class
Video conferencing tools are very useful for teaching. Apart from seeing the other person, you can share your screen, send files, or even host a session for multiple people, lecture-style.
You can use Google Hangouts, Skype, or Zoom (which is what we use for our meetings here at WordPress.com). Zoom has put together a handy tutorial for teachers.
If you’d like additional setup tips on selecting a theme for your website, adding content and media, and adding students as viewers or contributors, read our support tutorial on building a virtual classroom.
What amazing class are you going to launch?