
Know Your Audience: Meet the New Subscribers Feature in Jetpack Mobile
Picture this: You’re on the road when you get a notification that someone new just subscribed to your newsletter. You want to know more about this reader: are they engaging with your content? What other posts resonated with them? Until now, getting those insights meant waiting until you were back at your computer.
That all changes with the Subscribers feature in the Jetpack mobile apps.


Ever wonder who’s actually reading your content?
Content creators face a common challenge: understanding their audience while managing busy, mobile lifestyles. You might publish consistently and see your subscriber count growing, but key questions remain unanswered:
- Who exactly is reading your content?
- Which subscribers are most engaged with your newsletters?
- How can you add new subscribers when you meet potential readers in person?
- What’s the best way to track your community growth over time?
The Subscribers feature puts these insights directly in your pocket, transforming your mobile app into a comprehensive audience management tool.
Your complete subscriber dashboard
The Subscribers feature gives you a detailed view of everyone who follows your content, whether they’re email newsletter subscribers or visiting from the WordPress.com Reader. Here’s what you can see at a glance:
Subscriber profiles: Profile pictures, names, and email addresses help you put faces to your audience. You’ll also see when they subscribed and the country they’re reading from, giving you a better picture of your community.
Engagement insights: For each subscriber, you’ll see valuable metrics including emails sent, open rates, and click-through data. This helps you identify your most engaged readers and understand which content truly resonates with your audience.
Smart search and filtering: Need to find a specific subscriber quickly? Search by name or email address, then filter by subscription type—email subscribers who get your newsletter directly, or Reader subscribers who follow you through WordPress.com. Sort by join date or alphabetically.

Streamlined subscriber management
Adding new subscribers is now simple and secure, whether you’re adding one person or multiple subscribers at once. Built-in email validation prevents typos, while clear consent notices ensure you’re following email marketing best practices. Plus, you can directly contact engaged subscribers right from the app.
For creators with paid newsletters, the feature includes subscription plan details, billing cycles, renewal dates, and revenue tracking per subscriber—giving you complete visibility into your newsletter business.

Insights in your hand
Content creation isn’t just about writing great posts — it’s about building meaningful relationships with your readers. The Subscribers feature transforms your mobile device into a powerful audience management tool, giving you the insights you need to create content that truly connects with your community.
Whether you’re a blogger building your first following or a newsletter publisher managing lots of subscribers, this feature helps you understand your audience better and foster stronger connections with the people who matter most: your readers.The Subscribers feature is currently available in the Jetpack mobile app. If you already have the app, go check it out. If you don’t, download it today for iOS or Android.
How Long Does It Actually Take to Build a Website? Here’s What Our Experts Say.
You’re sifting through a lot of conflicting advice on how long it takes to build a website. Some say it takes a few days, others say weeks. So, who’s right?
The truth is, most website development timelines are just guesstimates.
These generic timeframes don’t factor in variables that could make or break your development process.
That’s why we spoke to our partners at WordPress.com to get realistic timelines for building a website. Drawing on their years of experience, our website development experts also share key factors to consider when estimating these timelines.
TL;DR: Here’s how long it takes to build common types of websites
- Small site (five pages or less): ≤ 1 week
- Dropshipping ecommerce site (<1000 products): 2-4 weeks
- Large education website (school/university): 3-4 weeks
- Government website: 4-6 weeks
- Large media website: 6-8 weeks
- Enterprise website: Several months to over a year
The site you’re reading right now would likely take 6-10 weeks to build.
Note: These estimates cover how long it takes to launch a site, and don’t include considerations for future content creation or maintenance.
Key factors that affect your website design timeline
There’s no universal timeline for building a website. Some sites go live in weeks, others stretch across months.
But you don’t have to rely on guesswork for your website design timeline. Here are the three factors that will determine whether your project stays on track or spirals into delays.
Planning and strategy
The planning phase sets everything in motion.
Start by identifying:
- Core purpose: Do you want to show your work, generate leads, sell products, or something else?
- Target audience: Who exactly do you want to reach? And what can they expect to get from your site?
- Essential functionality: What are the must-have features of your site, like lead capture forms, payment gateways, dynamic content, and more?
A week spent planning all these details upfront can save you months of revisions (and frustration) later. The goal is to keep everyone aligned on what success looks like and prevent scope creep or backtracking later.
Defining the scope
Scope defines the size and complexity of your site.
Scope creep can start with something as small as adding a new page, and suddenly, you’re two months behind schedule.
That’s why you want to finalize specifics like:
- Number of pages
- Type of features/integrations
- Level of design and animation
The more pages, integrations, or custom features you add, the more development time it takes.
As a best practice, you can divide your site’s scope into different phases. Phase 1 can include all essential features you need for the main launch, and the next phases can cover additional details.
Stakeholder alignment
Nothing kills momentum like conflicting feedback from different stakeholders. It can stall your progress for weeks.
The solution: Align your key decision-makers before you start building.
Make sure all stakeholders agree on:
- Overall vision and goals
- Target audience and messaging
- Budget and timeline expectations
- Who has final approval on which aspects of the site
Experts at rtCamp, an enterprise WordPress solutions provider, emphasized the importance of these factors for realistically determining website development timelines.
Once there is clarity on scope and decisions, a competent agency can go faster than even the times mentioned above. If clarity and alignment are still being worked out after kicking off the project, it can significantly stretch the project. However, sometimes that is required too. In many cases, clarity & alignment only happen once you get started.
– rtCamp
Put simply, this alignment ensures that everyone is working toward the same vision.
Note: Not familiar with business terminology like “stakeholder”? It’s just a term referring to anyone whose input is required to get a website launched. If you’re building a website for yourself, you’ve got nothing to worry about.
How long does it take to build a website using different methods
Once this legwork is complete, it’s time to start building.
We’ll break down two common methods for creating a website to help you determine your development timelines.
Here’s what our experts say about the timeframe for creating websites of different sizes:
| Site size/scope | DIY site builder | WordPress.com AI website builder | Professional agency / in-house team |
| Small | Few hours-2 weeks | <2 days | 2-4 days |
| Medium | 1-4 weeks | 3-7 days | 2-4 weeks |
| Large | — | — | 6-10 weeks |
| Extra-large | — | — | 6 months-1 year + |
Looking to build a simple website with five pages or fewer? Use our website design service to get a professionally designed website in four days.
And if you want to create a more complex custom website, we can match you with a web design agency suited to your business, budget, timeline, and expectations.

1. Do-it-yourself approach
- Best for: Small business, side project owners, hobbyists
- Type of websites: Personal portfolios, simple brochure sites, small blogs
WordPress.com lets you build a professional website entirely on your own, even if you don’t have any coding or design skills.
With this approach, you’re investing your hours learning a platform and creating a site one block at a time. It’s a trade-off between time and money, but it’s ideal for those with tight budgets and a desire to learn.
Tip: WordPress.com lets you create sites of all kinds. Check out the different types of websites you can build with this platform.
Here’s how you might get started with WordPress.com. After you create an account, you’ll need a theme that matches your vision for your website.
Choose from thousands of options available in WordPress.com’s library. Browse by specific use cases and industries, like real estate, health and wellness, music, and more. Plus, every WordPress.com theme is mobile-friendly by default, so you don’t have to spend more time making your site responsive.

After landing on the perfect theme, you can customize it to match your style.
At this stage, it’s tempting to tweak every color, button, and font till you find the best combination. But what really moves the needle is creating a proper structure and layout for your site. Think of this step as setting the foundation before the real work begins.
Instead of jumping straight into design edits, you should define:
- Which pages your site will include
- Layout for every page
- Navigation structure
Tip: Want to learn how to build a website with WordPress, step by step? Our free video course will show you how.
How long should you expect this work to take? We chatted with Mike Ilsley, Solutions Architect for our website design service, to see how long this DIY approach takes. He shared:
For first-time WordPress users, building a five-page site can take anywhere from a few hours to several days or even weeks, depending on how comfortable they are with the tools. That includes time spent learning the platform, choosing a theme, customizing content and design, and troubleshooting along the way.
– Mike Ilsley, Solutions Architect @ WordPress.com
WordPress.com’s AI Website Builder can slash this timeline from weeks to days (or even hours).
Simply add a prompt describing the type of website you want to build. Something like: “I’m launching a freelance photography business.” Then, answer a few questions about your business and goals.
In a few minutes, you’ll get a full-fledged website designed to meet your preferences. Edit this first draft to add your creative touches and roll it out when you’re happy with the result.

2. Working with professionals
- Best for: In-house teams, mid-to-large businesses
- Type of websites: Enterprise sites, government or education sites, media or news platforms, large ecommerce sites
If you want to build a custom website that truly stands out but don’t have months to master design tools, working with professionals can be a smarter move.
Think of it this way: you could learn to rewire your house, but you’d probably rather call an electrician to save yourself all the hassle.
When hiring a professional, you have two main options:
- Freelancers: They’re perfect when you need quality work without a hefty price tag. You can hire specialists for design, development, and copywriting.
- Agencies: They bring an entire team to cover all bases for your website design project. Work with an agency for complex sites with tight deadlines. You can choose a small or a big agency based on your budget.
Unlike the DIY approach, working with professionals involves a few different steps before you can get to the final product. Plan for these phases if you take this route.
Vetting and hiring
You can expect to spend anywhere from a few days to weeks finding the right vendor to build your website. This search involves browsing portfolios, interviewing shortlisted candidates, and comparing prices.
Onboarding and briefing
Once you’ve selected a designer or agency, you want to take a week or two to clearly outline your expectations.
Create a detailed creative brief covering your goals, target audience, must-have features, and brand guidelines. Curate helpful references to share your creative vision with the designer.
The bottom line: You want to provide clarity and show what success looks like for you. The more clarity you can offer at this stage, the fewer revisions you’ll need later.
Setting timelines
From there, you can establish communication channels and align on milestone-based timelines. For example, week 1-2 can be about wireframing, and week 3-4 can be about creating the first draft for the homepage.
Map out clear milestones for both sides to stay accountable and prevent any delays in the web design process.
Tip: Stay involved in the process without becoming overbearing. You can plan weekly check-ins or status reports to keep tabs on your site’s progress.
Design and development
Now, it’s time for you to take a step back and let the professionals work their magic. The timelines for this phase depend on the scope and complexity of your site.
In the design phase, you’ll see static/interactive mockups of every page.
These wireframes give you a sense of the site’s look and feel. Typically with large website design projects, you can request iterations based on your creative preferences and align on the designs before starting the development cycle.
In other words, think of it like working on your dream house.
You review detailed blueprints, request changes, and only start construction once you love the plans. Much easier to make changes on paper than after the foundation is poured.
 Source
 Once the designs are final, the development phase turns these layouts into live, functional pages.
In our chat with Mike Ilsley, he highlighted that build time depends on the site’s complexity, integrations, and the amount of content involved. Talking specifically about enterprise sites, he explained how it can take several months to complete projects of such scale:
Enterprise websites can take anywhere from several months to over a year to fully build and launch. Even for experienced teams, projects at that scale typically involve multiple stakeholders, custom development, ongoing QA, and a phased rollout. It’s not uncommon for large organizations to work with dedicated teams over many months to get everything in place.
– Mike Ilsley, Solutions Architect @ WordPress.com
Testing and review
Finally, your site goes through several rounds of testing and review before you give the final approval.
Professionals often send a checklist or staging site for you to review. You should thoroughly check every detail on every page. Test on different devices and browsers to find any bugs or areas of friction in the user experience.
Remember that it’s much easier to fix issues before launch than after.
Ready, set, launch on schedule
Building a website can be messy. And you’re bound to lose time without proper planning.
Use this guide to map out everything you need to go from idea to launch and plan your timelines realistically. Remember to build in buffer time at every stage.
Want to fast-track this process?
WordPress.com’s AI website builder does the heavy lifting for you. In minutes, you’ll have a complete, professional site that would normally take weeks to create from scratch. Customize it to match your vision, and you’re ready to launch!
Try WordPress.com’s AI website builder and see how quickly you can roll out your website.
How to Choose a Web Host: 10 Factors You Should Consider
Take it from someone who’s been burned by hosting companies: you don’t want to skimp on thoroughly evaluating your hosting provider. Overwhelmed by hundreds of web hosting providers online, I shrugged, “This one looks the cheapest,” and purchased a yearly plan without a second thought.
Poor customer support, inaccessibility, and a migration later, I regretted not spending more time choosing a better web host.
Don’t make the same mistake I did. Put in the time to make the right web host choice in the beginning so you don’t have to deal with a headache later.
What should you even evaluate in a web host? There are several features on their pricing pages, and many of them look similar. Which criteria are important? What can you compromise on? We’ll cover all that (and more) in this article.
What should you know before evaluating web hosts?
You can’t examine the various web hosting providers accurately if you aren’t 100% clear on what you need. Here’s a quick checklist of questions to help you nail down your requirements:
- What kind of website are you building? Get clear on your website’s category — is it a portfolio or a blog? Or are you planning to run an online store? The kind of website you build determines which features are the most valuable to you in a web host.
- How much traffic do you expect your website to receive? Your expected traffic and plans to run ads will help you choose web hosts that can scale as you grow.
- What security features do you need? If you are running a site that will store a customer’s payment details or any other sensitive information, you need a web host with strong security features.
- What is your budget (now and in the future)? Your web host provider should be able to grow with you as your website’s needs evolve, without breaking the bank. Have a rough estimate of what you can spend on a web host now and in the future.
- What is your technical skill level? If you can (and want to) configure everything yourself, your web host needs will look different than someone who isn’t tech savvy and/or doesn’t prefer to handle the hosting technicalities themselves.
Once you’ve answered the above questions, you’ll be much more confident in evaluating the various web hosts in the market. You should answer the above questions even if you’re migrating your site from one host to another — it will help you pinpoint what additional services you’re looking for.
Now that you know exactly what you need, let’s get into the nitty-gritty and examine each individual factor you should vet in a web host.
10 factors to consider when choosing a web host
Here’s a comprehensive list of factors you should consider for each web host you examine:
1. Type of hosting
There are several types of web hosting — each suited to unique website sizes, traffic levels, technical skills, and budgets. Pick the right one for your needs.
- Shared hosting is when you share your server with other websites. This makes it more affordable, but slower.
- VPS hosting is when you share your server resources with other websites, but have a dedicated slice of your own. It’s more reliable and scalable than shared hosting, but it also costs more and requires technical know-how.
- Dedicated hosting is when you have a server all to yourself. Your website is fast and reliable. Plus, you have complete control over every aspect of your website, but it can be expensive, and you have to manage everything (or pay someone else to manage everything).
- Cloud hosting is when your site runs across multiple cloud servers. It’s reliable and fast, but may require setup and monitoring.

Some web hosts in the market provide all these hosting types, while others provide specialized hosting. Choose web hosts that offer the kind of hosting you need now and might need in the future.
For example, if you’re building a food blog from scratch, you might be A-OK with shared hosting in the beginning. However, as your website traffic grows, you might need to move to VPS or dedicated hosting to improve your site experience. In this scenario, look for web hosts that offer both shared and VPS hosting.
While you’re at it, it’s also worth evaluating the types of hosting at the service level.
- Unmanaged hosts provide a barebones server that you manage yourself. This means that you have to handle any updates, firewalls, backups, etc. It’s more cost-effective, but only recommended when you want a customized server setup and have in-house technical resources to manage it.
- Managed hosts handle the majority of the technical tasks, such as server setup, security, backups, and more. It often costs more than unmanaged hosting, but the peace of mind (and time saved) is worth it.

Your web host always manages shared hosting. This means the host is responsible for configuring the distribution of resources and ensuring each site is secure. If you’re opting for shared hosting, it’s especially important to evaluate the quality of your management host because you don’t have control over your website’s security and resource allocation.
You can choose between managed or unmanaged hosting in all other hosting types. However, as discussed before, unmanaged hosting is the right choice only when you need to customize the server stack and know how to do it well. For everyone else, managed hosting is the better alternative because it allows you to focus on growing your site rather than doing upkeep tasks.
Tip: If you choose WordPress.com (which offers managed WordPress hosting), your site will stay fast, secure, and online without any hassle. Your whole website management — including backups, updates, and infrastructure — is on us.
2. Pricing
Price is an important factor when it comes to choosing web hosts. You don’t want to make the mistake of thinking that the cheapest or the most expensive is the best option.
Instead of considering extremes, evaluate web hosts based on their ROI: are they providing you with all the features you need (and maybe a few additional perks) at a reasonable price?
Once you do that, the second step is reading the fine print. Many web hosting providers offer a lower price in the first year and significantly raise the prices the next year. The solution? Evaluate renewal rates to ensure you’re making the right long-term choice.
While you are at it, also look at the “perks” like website backups — they might be free for the first year only. Check their cost at the time of renewal, and consider fees for backups, SSL certificates, and migrations. Look closely at all of these factors and add up the total price you’ll pay at the time of initial purchase, as well as renewal.
Many web hosting providers also offer a money-back guarantee, but exclude fees for additional services — like setup, migration, or domain registration — from this promise. Ensure you know this before you sign up for a web host so you know what you can get back and what you can’t.
Regarding billing options, many web hosts offer significant discounts on yearly or multi-year payments. Commit to a web host for multiple years if you’re confident they are the one you want.
If you’re signing up for numerous years with a web host, research their price increase history first. Many hosts might increase their prices too much compared to their competitors after a few years.
Tip: In addition to monthly and annual plans, WordPress.com offers options to pay every two or every three years. All annual and multi-year plans offer discounted pricing, even after renewal, so you can save money while knowing your site’s long-term home on the web is secured.
3. Security
Your website is prone to viruses and malicious attacks if your web hosting provider doesn’t have strong security features. Here’s what you should look for:
- Access controls to ensure no unauthorized person can access your IP address.
- Automatic website backups and updates.
- Firewall and malware protection.
- SSL certificates.
Some security features — like SSL certificates — are standard across most web hosting providers. Many even offer it for free for the first year. If your website handles sensitive customer information or has significant traffic coming in, however, you need to go beyond the basics. Monitor the security features closely to ensure it matches what you need.
Tip: If you have chosen managed hosting via WordPress.com, for example, your website’s security and safety are fully accounted for. There’s brute-force protection to protect your account password, shield from DDoS attacks, automated malware removal, and a lot more. You can sleep peacefully knowing the security of your site is in good hands.
4. Speed and reliability
Your website’s performance depends on uptime and load time. Your host dictates both of those things. Look for hosts that offer a high uptime guarantee — the industry standard is 99.9% uptime or higher. You can also check your terms and conditions to understand if your web host offers compensation for downtime.
Your site’s speed is affected by various factors. For starters, if you choose shared hosting, you share your resources with other customers, which means if other servers experience too much traffic, your site might slow down. Examine how your web hosting provider configures resources in a shared hosting plan.
You also want to look for web hosts with data centers close to your audience’s location to speed up loading times. Or you could choose a web host like WordPress.com that offers a global content delivery network (CDN) with 28+ edge locations already built in.
 Here is a look at Automattic’s global network of data centers (which power WordPress.com). You can see a live traffic map here.
Lastly, monitor other performance features such as SSD vs. HDD storage (SSD is faster), built-in caching mechanisms, and server response time.
Tip: WordPress.com offers 99.99% uptime (seriously). However, if your site does experience downtime (Business plan or above), you will get alerts the minute downtime is detected.
5. Storage and bandwidth
Storage is how much data you can store on your server, including website files, images, videos, emails, backups, etc. How much storage you need is unique to your website and needs. For example, someone building a one-page website (like a portfolio) might not need a large amount of storage space, but a small business expanding rapidly might.
In shared hosting, some web hosts might list “unlimited” storage, but restrict the number of files you can store under fair usage policies. Make sure you read the clause details properly to know your storage limitations.
On other hosting types, you can customize the storage you need based on the various web hosting plans. For example, WordPress.com offers 13 GB of storage in its Premium plan, while our Business and Commerce plans start at a generous 50 GB (with the option to purchase more storage).
When monitoring hosting storage plans, check if you can increase your storage without downtime and whether there are any file type restrictions.
Bandwidth is the amount of data transferred between you and your visitors. The amount of bandwidth you need depends on your average page size, monthly visitors, page views, and unexpected traffic spikes. You can use a website bandwidth calculator to determine how much bandwidth you might need.
 Source
Some web hosts — like WordPress.com — offer unrestricted bandwidth. Others might slow down your site after you exceed a certain limit. A few also charge for stretching the bandwidth. Choose a web host that can comfortably meet your bandwidth needs not just today, but in the future.
6. Customer support
Imagine you have an online store and your website is down for a few days. This isn’t just inconvenient, it’s revenue lost. Website issues are often urgent and need to be resolved quickly.
Choose a web host with reliable 24/7 support (in multiple formats), so you get the help you need instantly. Ideally, you’d want to look for live chat or phone support to get quick responses. However, you should also look at ticketing systems and promised resolution times to understand how quickly your web host will respond to larger issues that might arise.
It’s also worth checking out the support documentation of web hosting providers. Do they answer FAQs thoroughly? Do they have video guides for beginners? Is the knowledge base regularly updated? Would you be able to resolve many issues independently?
Some web hosts, however, don’t deliver on their promises. Check reviews from third-party sites like TrustPilot or G2 to understand if the web host lives up to their promises.
Tip: In addition to top-tier customer support, look for hosts that provide high-quality support documentation.
7. Ease of use
The control panel of your web hosting provider should be user-friendly. You should be able to navigate it and manage your database, emails, backups, etc. If you need assistance doing basic tasks, too, you may get frustrated and unnecessarily waste time opening your web host account.
This is, again, where an extensive knowledge library is invaluable. If your web hosting provider has laid out tutorials and blogs on building a website using their tool, you won’t be stuck trying to figure it out.
8. Migration
If you are moving your site from another web hosting provider, check if your new one offers a free migration service. For instance, if you want to move your site to WordPress.com, we provide a free migration service.
You also want to check the process of moving your website. Is it easy to import your site files? Are there any risks of losing your data? How much time does the whole process take from start to finish?
Understanding the above before migrating your site to a new web host will help make the process smoother and risk-free.
9. Integration with CMS/website builders
Most popular web hosts offer integration with popular CMS platforms and website builders like WordPress and others. You want to choose a web host that connects seamlessly to your CMS or website builder.
Many web hosts — like WordPress.com — are fine-tuned for a specific CMS (like WordPress). CMS-specific hosting offers tailored support, automated updates, and CMS-specific firewalls.
10. Additional features (like custom email, domain name, etc.)
Can you purchase your domain name, professional email address, and web host from different providers? Of course. Many web hosting companies, however, bundle them together and offer a discounted price, helping you save money and admin work.
For example, all WordPress.com sites get a free domain for one year. There are also other perks, like tons of Jetpack-powered features at no extra cost. Look at the various perks website hosts offer and choose the ones that make the most sense for you.
A web host is your site’s home
Your website host is your website’s home on the worldwide web — make the choice with careful consideration. You don’t want to pick a home that costs less but has a leaky roof.
If you don’t want the hassle of continually working to maintain your site, opt for managed hosting via WordPress.com. We ensure your website remains online, fast, and secure regardless of traffic spikes, so you can focus on growing your business on the internet carefree.
For a Limited Time: Unlock Plugin Power on Personal & Premium Plans
We hear you. You love your WordPress.com Personal or Premium plan, but there’s that one plugin — or two — you’ve been itching to try. Normally, plugins are only available on Business and Commerce plans. From August 12 to August 25, 2025, new customers and users upgrading from free plans can now use plugins on all new Personal and Premium plans.
What can you do with plugins?
With plugins, you can go beyond the basics and unlock powerful features for your sites:
- Boost your visibility with advanced SEO tools like schema markup, redirect management, and fine-tune how your content appears in search engine results.
- Add niche features such as recipe cards, event calendar, booking tools, and more without coding.
- Design with more freedom with additional blocks, page builders, and styling controls.
- Streamline your workflow by adding editorial calendars, role editors, and custom content types specific to your site’s needs.
- Sell products or services with e-commerce plugins and many more.
Think about that one feature you’ve been missing; now you can try it out for yourself.
Why now?
Plugins open the door to even more ways to customize your site and bring your ideas to life. On our Business and Commerce plans, we offer these tools along with the extra support and flexibility they require to run your site smoothly. Many of you have asked for the chance to try plugins on Personal and Premium plans, so we’re making it happen for a limited time.
This window from August 12 to August 25 is your chance to explore plugins on all paid plans that usually don’t include them.
After August 25, plugin access returns to WordPress.com Business and Commerce plans only. Customers who have bought during the two-week promotion period will be able to keep plugin access as long as they keep their original plan.
Who’s this for?
This offer is for anyone ready to start something new on WordPress.com — whether it’s your first site or your next one. If you purchase a new Personal or Premium plan during this two‑week window, you’ll unlock plugin access for that site.
- New sites signing up for WordPress.com Personal or Premium plans during the offer
- Free plan users upgrading to WordPress.com Personal or Premium plans
If you already have a paid Personal or Premium plan, this offer doesn’t apply, but you can upgrade to a WordPress.com Business or Commerce plan anytime to get plugins. Offer is not applicable for downgrades and renewals at this time.
Ready to try that plugin you’ve been eyeing?
This is your chance to try WordPress.com without limits. Grab a new Personal or Premium plan by August 25, 2025, and unlock plugins for that site — forever — and build the site you’ve been dreaming about.
We’re excited to experiment with this alongside you and see what you create. This is a chance for us to learn together, discover what you build, and explore how plugins can help you achieve your goals. We look forward to hearing your thoughts and feedback as you try new things, share what works, and tell us what you would like to see next.
This offer ends on August 26 at 7 a.m. (UTC).
WordPress.com Design Update for a More Intuitive Experience
We’re excited to tell you more about WordPress.com’s new navigation experience. The update makes managing your entire site more intuitive and creates consistency across all parts of WordPress.com. This update also allows you all to take advantage of the wider WordPress open source community, creating the same admin menu as WordPress.org that you see referenced in lots of documentation and tutorials.
As we continue to grow, we’ve heard that navigating WordPress.com could be confusing because of different sidebars layouts, menus, etc. We listened to your feedback and ran usability tests on new designs to improve the experience.
Updated Sidebar Menu Design in WordPress.com

This design update combines sidebars and menus that were mismatched and streamlines them into one dashboard that’s consistent for everyone.
For many of you, there will be little to no change in how you use WordPress.com. For those of you who access advanced features, you can easily enable wp-admin as your default view in your Account Settings. We’re surfacing most menu items from third-party plugins and themes by default. You can learn more about interface and account settings here.
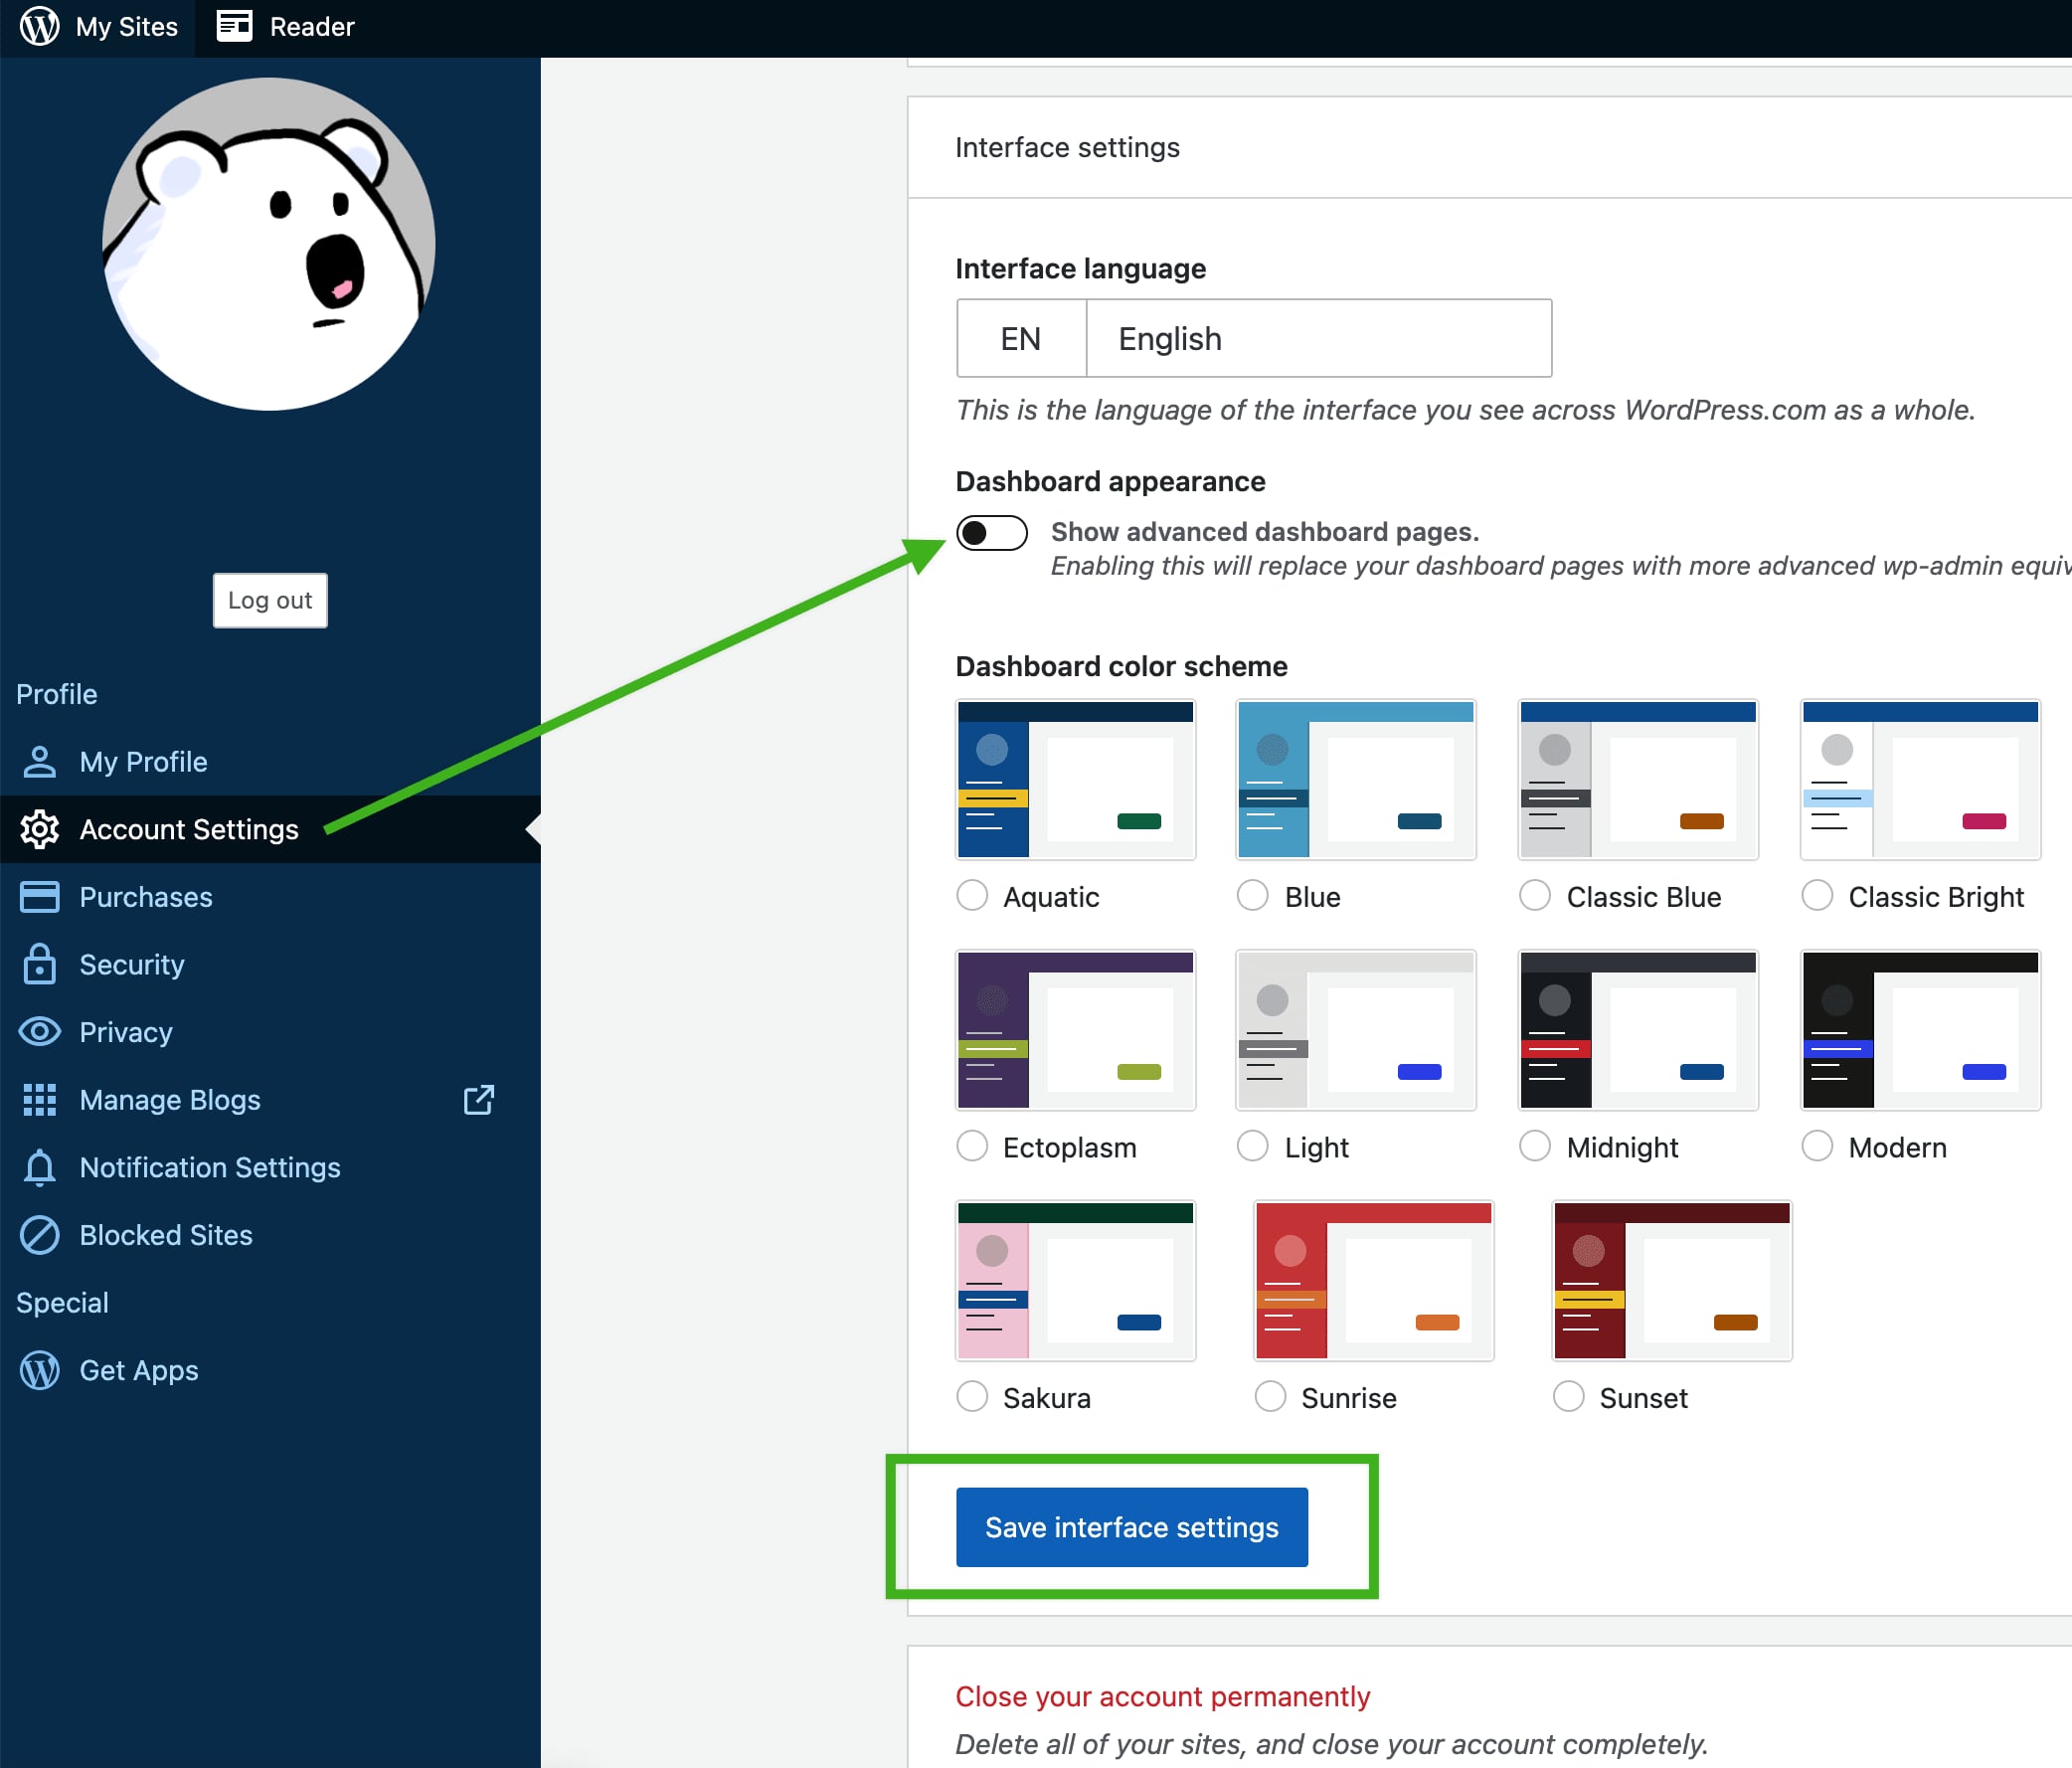
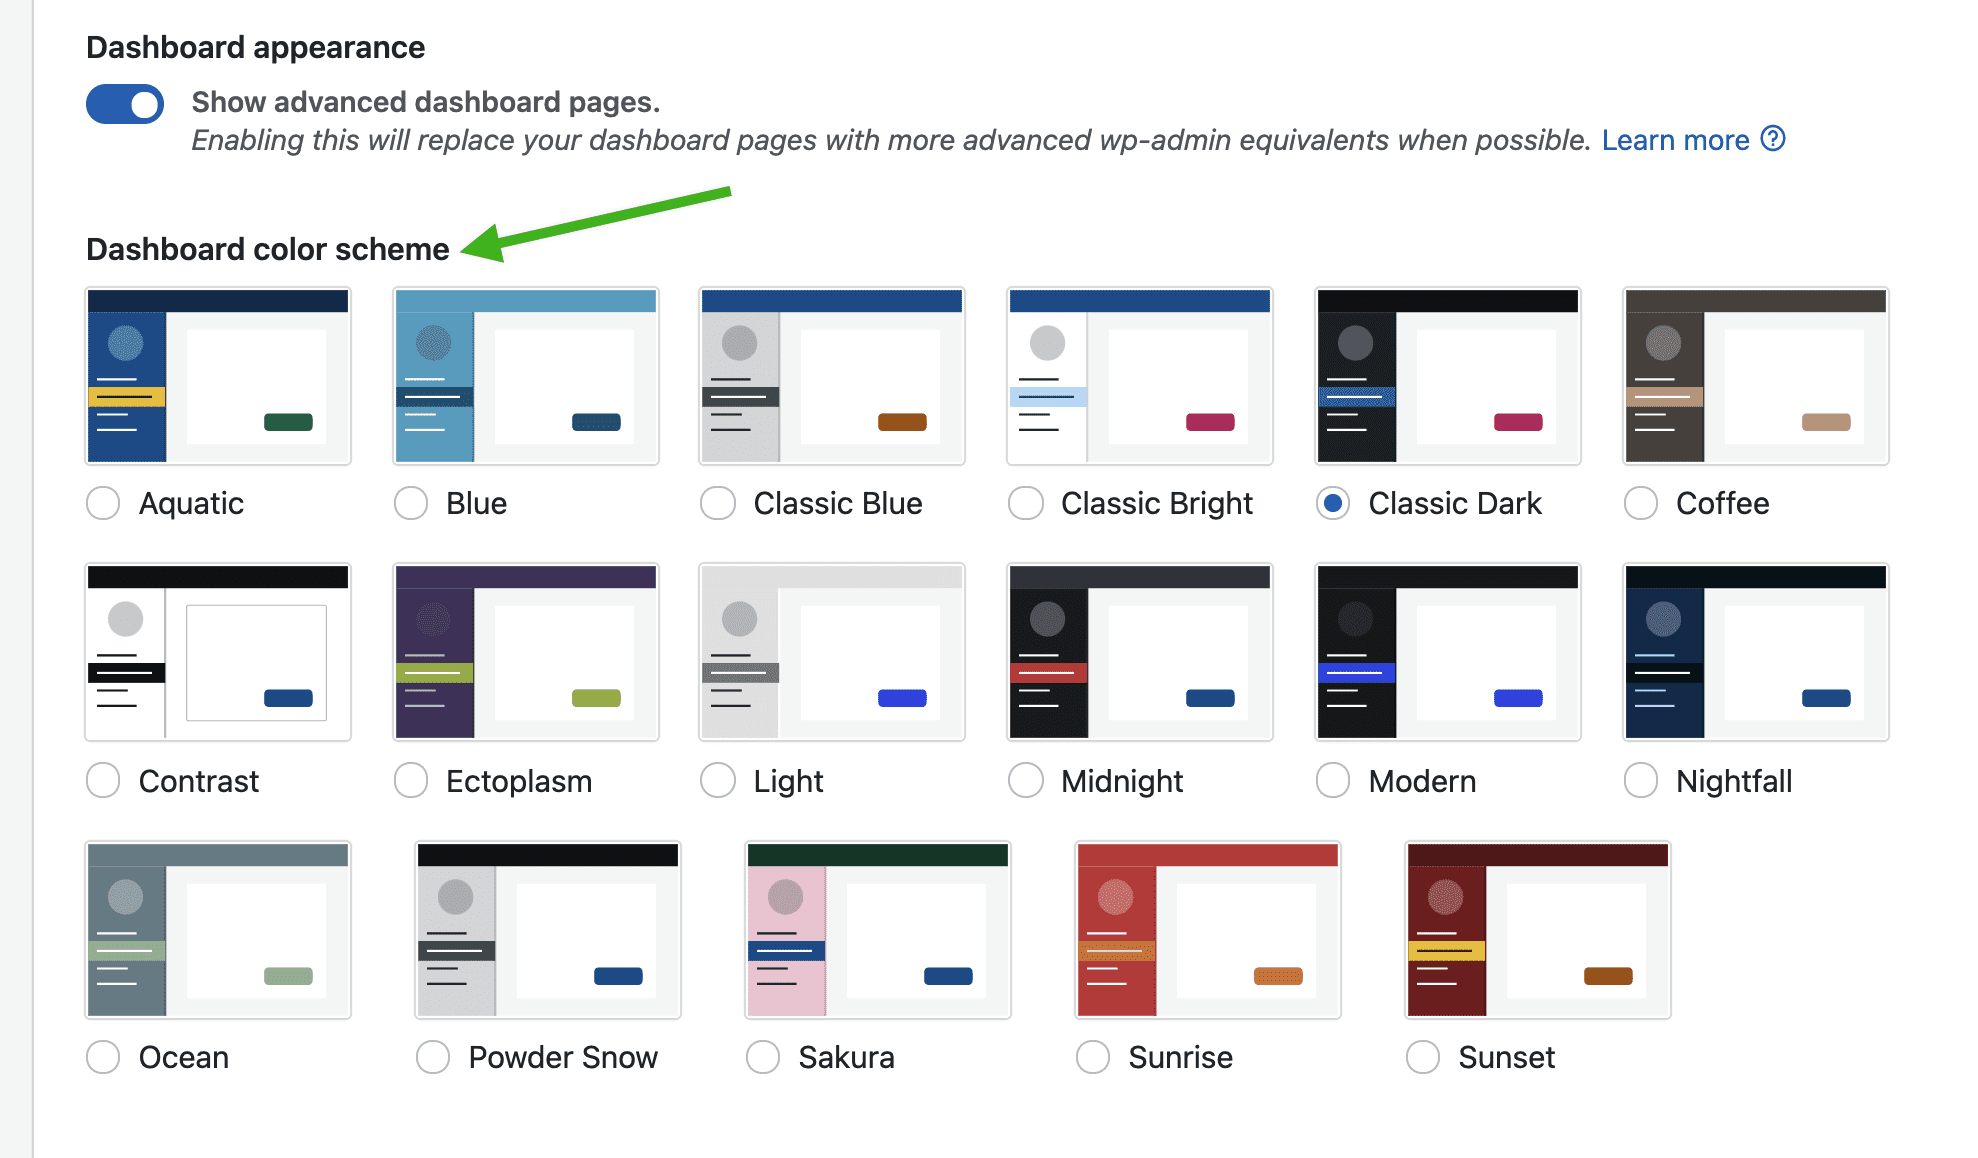
While you’re in Account Settings, give your WordPress.com interface a new color scheme. You can now choose a color for your dashboard.
Thanks for the continued feedback to make WordPress.com more intuitive to use for all. And we’re not done yet – we’ll continue to listen and evolve as WordPress.com grows. Happy WordPressing!
Building Single-Page Websites on WordPress.com
WordPress.com supports a wide range of features for building your online presence: blogs, online stores, newsletter signup forms, and more. These tools are invaluable for many customers, but they can seem excessive for folks who are just looking to create a straightforward single-page website. If that’s you, read on for examples of how you can also create one-page websites here on WordPress.com.
Both examples use WordPress.com’s freshly-launched Blank Canvas theme, which is optimized for single-page websites. It comes with no header, navigation menus, or widgets, so the page you design in the WordPress editor is the same page you’ll see on the front end. The theme also comes with a handful of ready-made Block Patterns to help kick start your site.
About Me
By using the “About Me” block pattern, your website can be a special, concise introduction to who you are and what you do.
Start with the new Blank Canvas theme. Once that’s installed and activated, open your homepage in the WordPress Editor. If you have homepage content already, feel free to select it all and delete it.
With a blank slate in place, you’ll want to open the block selector, and switch over to the Patterns tab. By default, this will show you the single-page patterns that are included with the Blank Canvas theme. Selecting the “About Me” pattern will provide you with a beautiful starting point to begin customizing.
With just a few clicks, you can personalize the images, text, and social media links to make your site your own.


Collections of Links
Sending your followers to a single link is increasingly important. A handful of social media services only allow you to link to one webpage (I’m looking at you, Instagram). Or maybe you’re a musician, and you want to point folks to your new album on their music service of choice — Spotify, Apple Music, Bandcamp, or Tidal. Having a single page full of links is becoming a necessity — and Block Patterns provide a simple path to creating one on WordPress.com.
Again, let’s start with the new Blank Canvas theme. Open the homepage, and delete existing homepage content, if you have any. From there, you’ll want to open the Block Patterns panel again, but this time, select the “Links” pattern.
This will provide you with a template you can use to begin your list of links. Customize or delete the user photo, add your name, links, and a description if you’d like. Each sample button can be customized or removed, and you can add as many links as you’d like.

Once you have this the way you like it, copy your site’s address and paste it into social media!
If you have an existing site that you’d like to convert into a single-page site, we have you covered too. We’ve added a new setting to 20 of our most popular themes that will let you hide the header and some footer elements on the homepage. This will provide you with a blank slate to build from.
What other types of websites (single-page or otherwise) would you like to see more resources for? Share in the comments below!
What’s New in the Block Editor: Edit Your Images, Drag and Drop Blocks and Patterns, and More
From time-saving features to enhancements in your favorite blocks, these block editor improvements will help you build posts and pages on your site, no matter what you publish:
- Crop and rotate your images with built-in editing tools
- Drag and drop blocks and patterns for more control
- Display a list of your pages with the new Page List block
- Match your brand palette with an improved Social Icons block
- Strategically place your CTAs with a better Buttons block
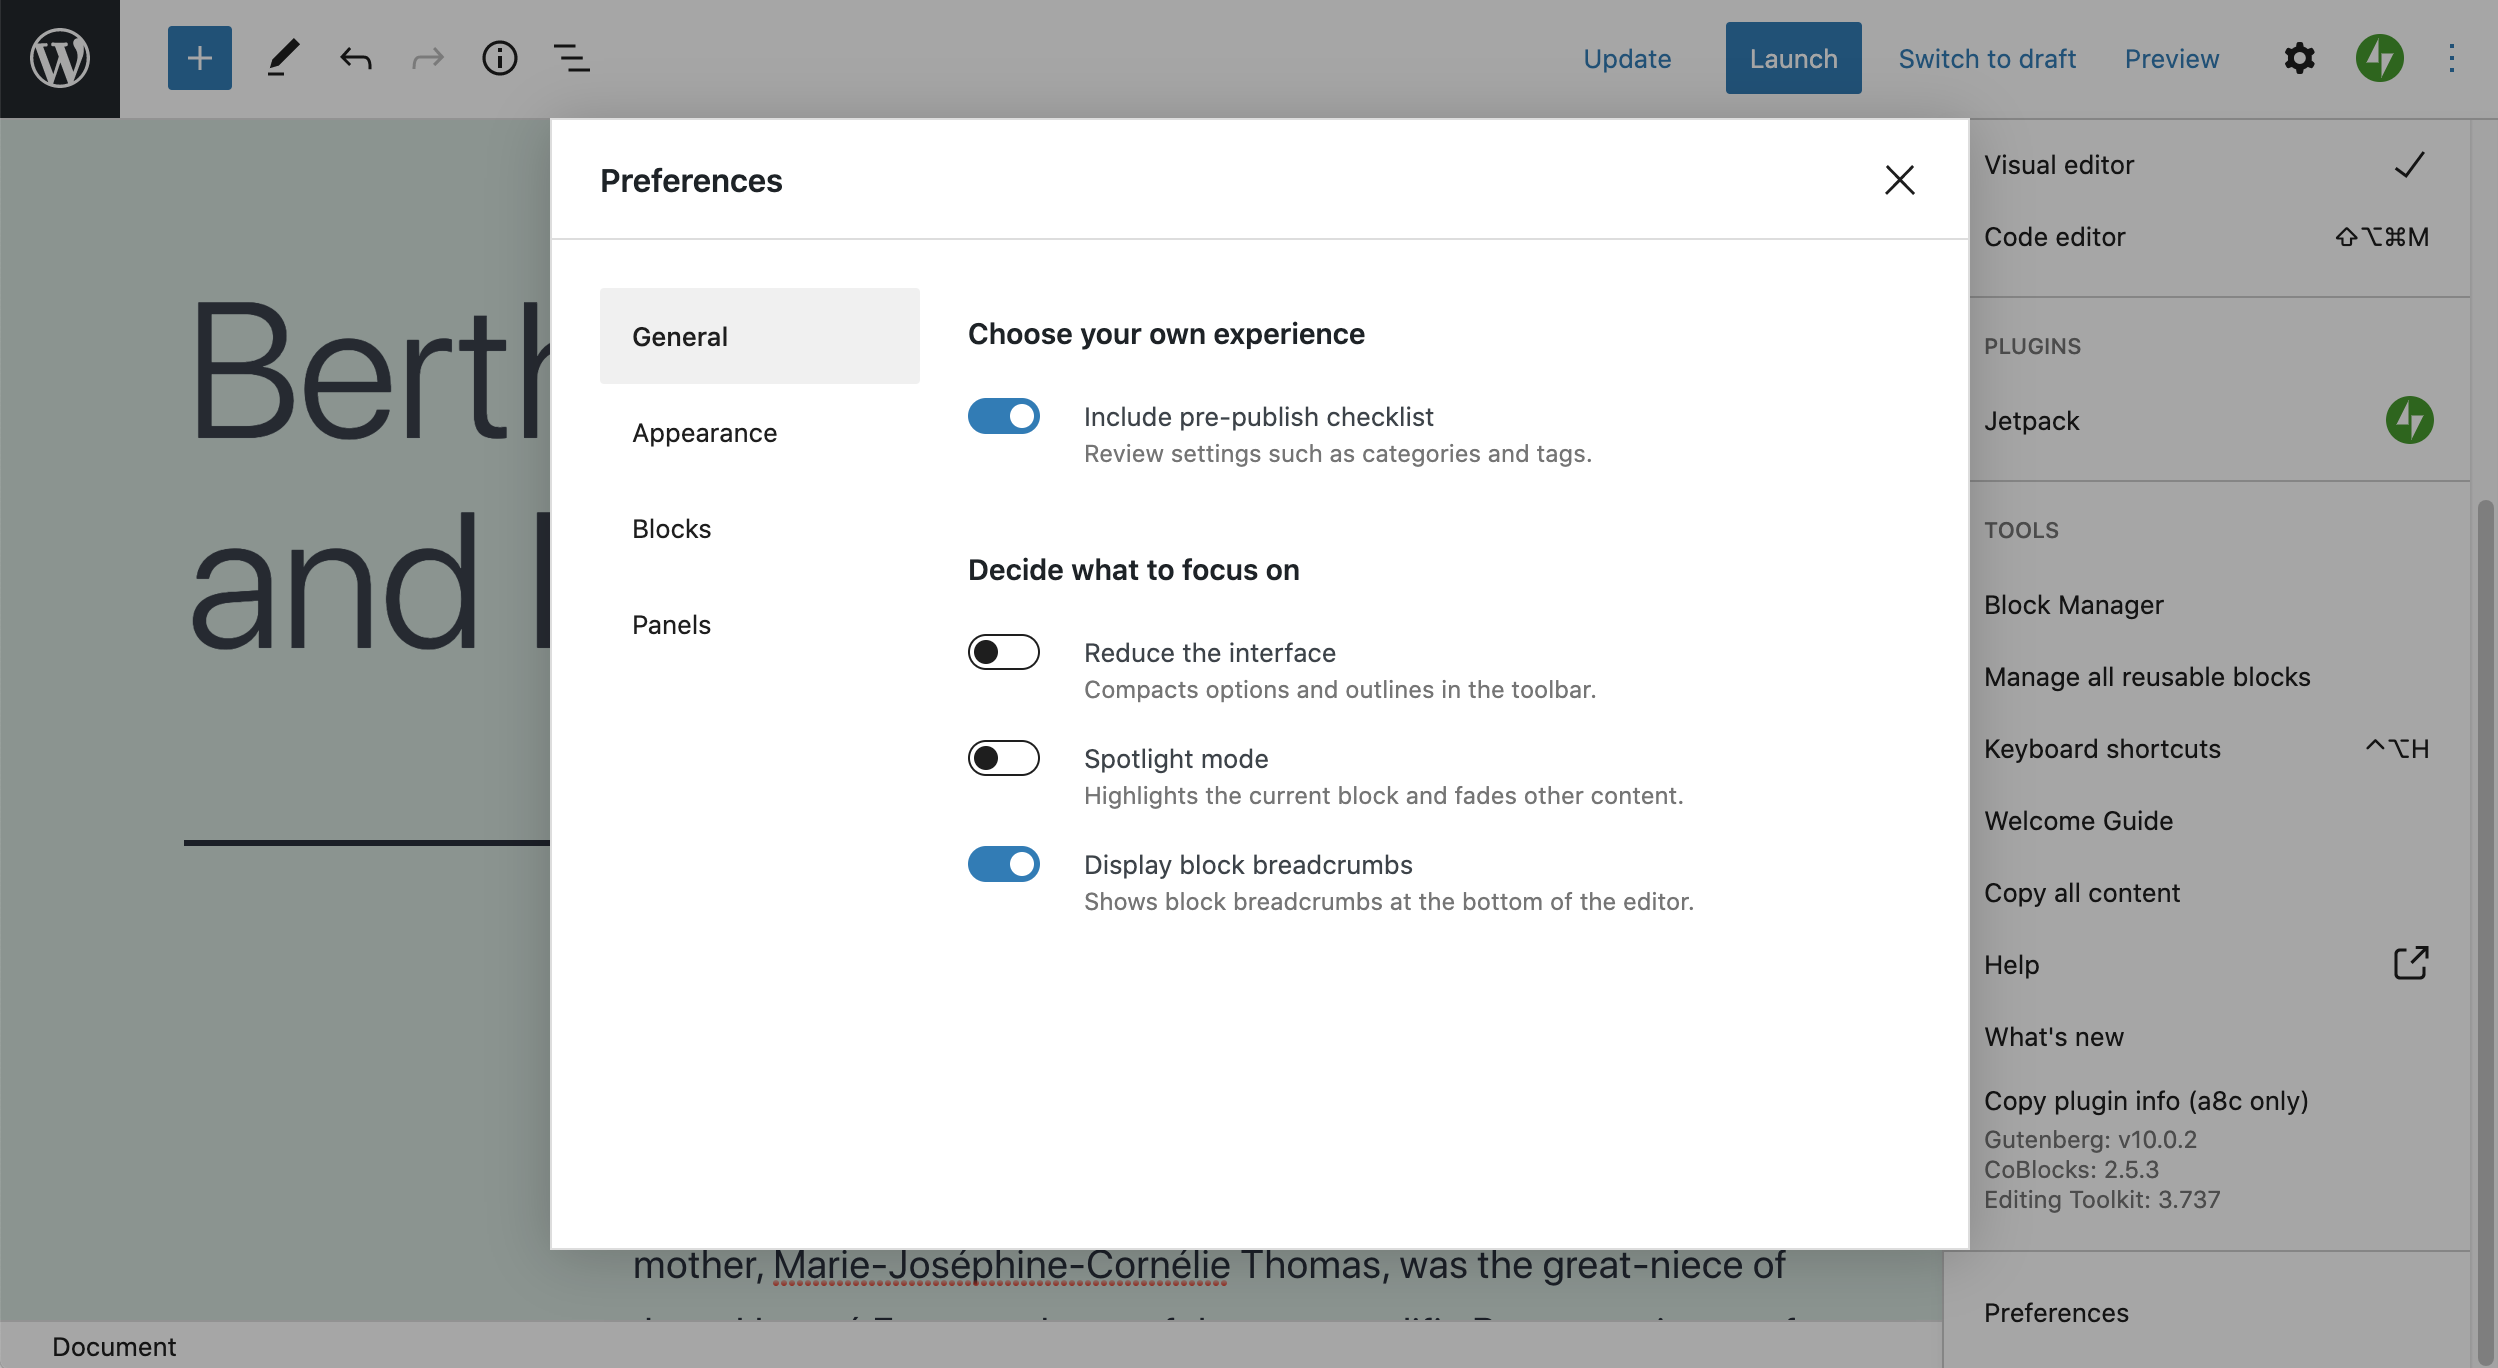
- Manage your preferences in a refreshed panel
Let’s take a closer look.
Crop and rotate your images with built-in editing tools
Tired of switching between WordPress.com and an editing tool like Photoshop or Canva to make quick fixes to your images? There’s no need to leave the block editor to crop or rotate your photographs — you can now make changes with a few clicks in the toolbar that appears above the image.
Your original image is always saved in your Media Library, so you can crop and re-crop until you get it just right.
Drag and drop blocks and patterns for more control
Here’s a usability win: you can now drag and drop blocks and block patterns from the Block Inserter on the left directly into your editor canvas on the right. This gives you finer control over where you place new content on a post or page.
Display a list of your pages with the new Page List block
Say hello to the new block on the block: the Page List block! Let’s say you want to show a list of all of your recipe blog’s pages on a single page so readers can see an overview of your culinary content. You can use the new Page List block to automatically compile and display a hierarchical list of all your site’s published pages.
Match your brand palette with an improved Social Icons block
Does your current site background make certain social icons invisible or difficult to see? Do you want to customize the colors? With updates to the Social Icons block, you can now set custom colors for the icons and the icon background by using the color picker or specifying a HEX color code. Match your business or brand palette if you wish!

Strategically place your CTAs with a better Buttons block
A strong and visual call to action, or CTA, encourages interaction on your site, whether you’re a tax consultant seeking new leads with a Contact Me page or an online meditation teacher presenting your membership tiers on a Services page. Using the Buttons block, you can align your CTA buttons on a page, either horizontally (in a row) or vertically (stacked in a column). You’ll see this new vertical option in the block’s settings, so you can switch between layouts with ease.

Manage your block editor preferences in a refreshed panel
We’ve repackaged various options and settings for your block editor into a separate panel, sorted into four sections: General, Appearance, Blocks, and Panels. We hope this more streamlined panel helps you set up your block editor exactly as you want it.
Keep building with the block editor. We’ll keep improving it.
The block editor is continuously growing and improving as a result of your feedback — thank you. We can’t wait to see what you build next with it. In the meantime, we’re working hard behind the scenes, with more updates to come!
Introducing WordPress Stories: A New Way to Engage Your Audience
Since the early days of Snapchat, which made the format so popular, Stories have become a powerful way to engage audiences on social media. Today, over 500 million Instagram accounts use Stories every day. Now, you can publish Stories on your website — a place where you truly own your own content.
With Stories, you can combine photos, videos, and text to create an engaging, tappable, full-screen slideshow that your visitors will love. You can conveniently publish Stories from your phone, giving you more ways to keep your site fresh and optimized for your increasingly mobile audience.

Stories are the perfect format for:
- Step-by-step guides
- Recipes and cooking tutorials
- Updates on your DIY or art projects
- A behind-the-scenes look at your latest product
The Stories you know, but better
WordPress Stories are different in a few ways.
Stories are published on your site as a blog post, which means they can be viewed, liked, and commented on by your site visitors, just like any other blog post. Your Stories have a permanent URL that can be shared and linked to from other platforms. And if you’re using the Publicize feature on your WordPress site, your Story can automatically be shared with your social media fans and followers, expanding the reach of your content.
We know it takes a lot of effort to create great content. Unlike the Stories you’re familiar with on other social platforms, Stories on your WordPress site won’t disappear after 24 hours! This means you can edit or add to your Stories long after you first publish them.
Ready to try it out?

All WordPress.com sites and self-hosted Jetpack sites can start using Stories today with the free WordPress mobile app for Android or iOS. The Stories feature will be available in the desktop block editor and on iPad devices later this year.
For a detailed, step-by-step guide, visit the Story Block support page.
Turn Your WordPress.com Blog into a Podcast with Anchor
Blogging on WordPress.com is all about sharing your unique voice, and starting today, you can extend that to another platform: Anchor. We previously shared some tips and tricks for getting started with a podcast on WordPress.com and are thrilled to share this new option.
Anchor, part of the Spotify family, powers 80% of all new podcasts on Spotify, with free tools to easily create, distribute, and monetize, no matter how you record — including podcasting with your WordPress.com blog!
Creating an Anchor podcast from your site is free and seamless. After all, you’ve already got a whole blog’s worth of written content to use. With Anchor, all that’s left is converting your words into audio, which can be as easy as using your blog to quickly record a text-to-speech version.
Blog-to-podcast benefits
Making a podcast out of your blog breathes new life into the work you’re already doing — you can make your unique blogging voice actually audible! By converting your blog into a podcast, you’re leveraging the power of audio to grow your brand, audience, and income — without any extra work. Hundreds of millions of listeners (and counting) consume podcasts every day, and they’re constantly looking for fresh voices and perspectives. Whether you have a built-in WordPress.com audience to bring over or not, an audio extension of your blog means another avenue for exposure — to your existing followers and new ones. And then there’s monetization: Anchor Sponsorships lets you read ads in your own voice during a break in your podcast; Anchor’s Listener Support feature, meanwhile, allows your biggest fans to support your work via a recurring monthly donation.
A podcast version of your WordPress.com blog also introduces an entirely different audience to your work, and frees listeners up to do what readers aren’t able to: multitask! There are, of course, many benefits to readers fully immersing themselves in the written content of a blog. But audio enables listeners to consume your work while performing everyday activities, like going for a walk, driving, cooking, relaxing — or simply exploring something new.
Let your words do the talking
Connect your site to Anchor and your existing blog posts will import as episode drafts

Your blog can almost literally do the talking for you with direct text-to-speech, similar to an audio transcription of an article. This is a great option for blogs less dependent on top-notch production value and more focused on the content itself — such as well-researched news, sports, essays, and wellness stories. With text-to-speech conversion, your blog can be podcast-ready in a few minutes.
Converting your blog post to podcast-ready audio and distributing your new show takes just a few minutes.

Of course, if you want to create a podcast that highlights your actual speaking voice, you can record it by reading a transcript of your blog post, which will be imported directly into Anchor for easy access.
You can get more creative, too, by using your blog as a jumping-off point to host an audio discussion about the blog topic. Or let your blog serve as inspiration for a more traditional podcast, where you host and interview guests, record scripted segments, and much more, in ways amplified by audio!
Create a podcast today
There are a number of different ways to turn your WordPress.com blog into a podcast. The amount of work it takes can be surprisingly minimal — or more hands-on if you like. Whether you just want to create an audio version of your blog, expand your blog concept to a different platform, or simply try your hand (and voice) at a new medium, there’s a podcast structure for you. Most importantly, your written work means you’re not starting from scratch.
Here’s a step-by-step guide for creating a podcast on Anchor from your existing posts on WordPress.com:
Be sure to create a new Anchor account to link with your WordPress.com account — existing Anchor accounts cannot be linked at this time. You can also convert all of your newly published posts on WordPress.com into podcasts as well.
If you’re looking for inspiration, a perfect example is TheDesignAir, whose blog covers aviation design and product news. Check out their text-to-speech podcast with Anchor:
Ready to turn your blog into an Anchor podcast for free? Get started by creating a new Anchor account. Happy podcasting!
Build a Beautiful Site in the WordPress Mobile Apps with Predesigned Page Layouts
Your WordPress mobile app is a convenient way to create and manage your WordPress site. Now, you can design a new page right from your phone or tablet — and build the site of your dreams — with predesigned page layouts.
Introducing starter page layouts
Not all of us are designers, and building a page on your site with the layout in your mind can be intimidating and time-consuming — but it doesn’t have to be that way! Now when you create a new page on WordPress for iOS or Android, you can choose from premade layouts. You can also customize them to fit your needs, right from the block editor.
Choosing a layout
When you create a new page in the app, you’ll see a list of premade page layouts, including about pages, contact pages, team pages, services pages, and more. Whether you’re the owner of an online shop of sustainably made clothing, the founder of a newly formed digital magazine, or a financial strategist who’s just launched a consulting business, you can use these premade layouts to build the most essential pages on your website.
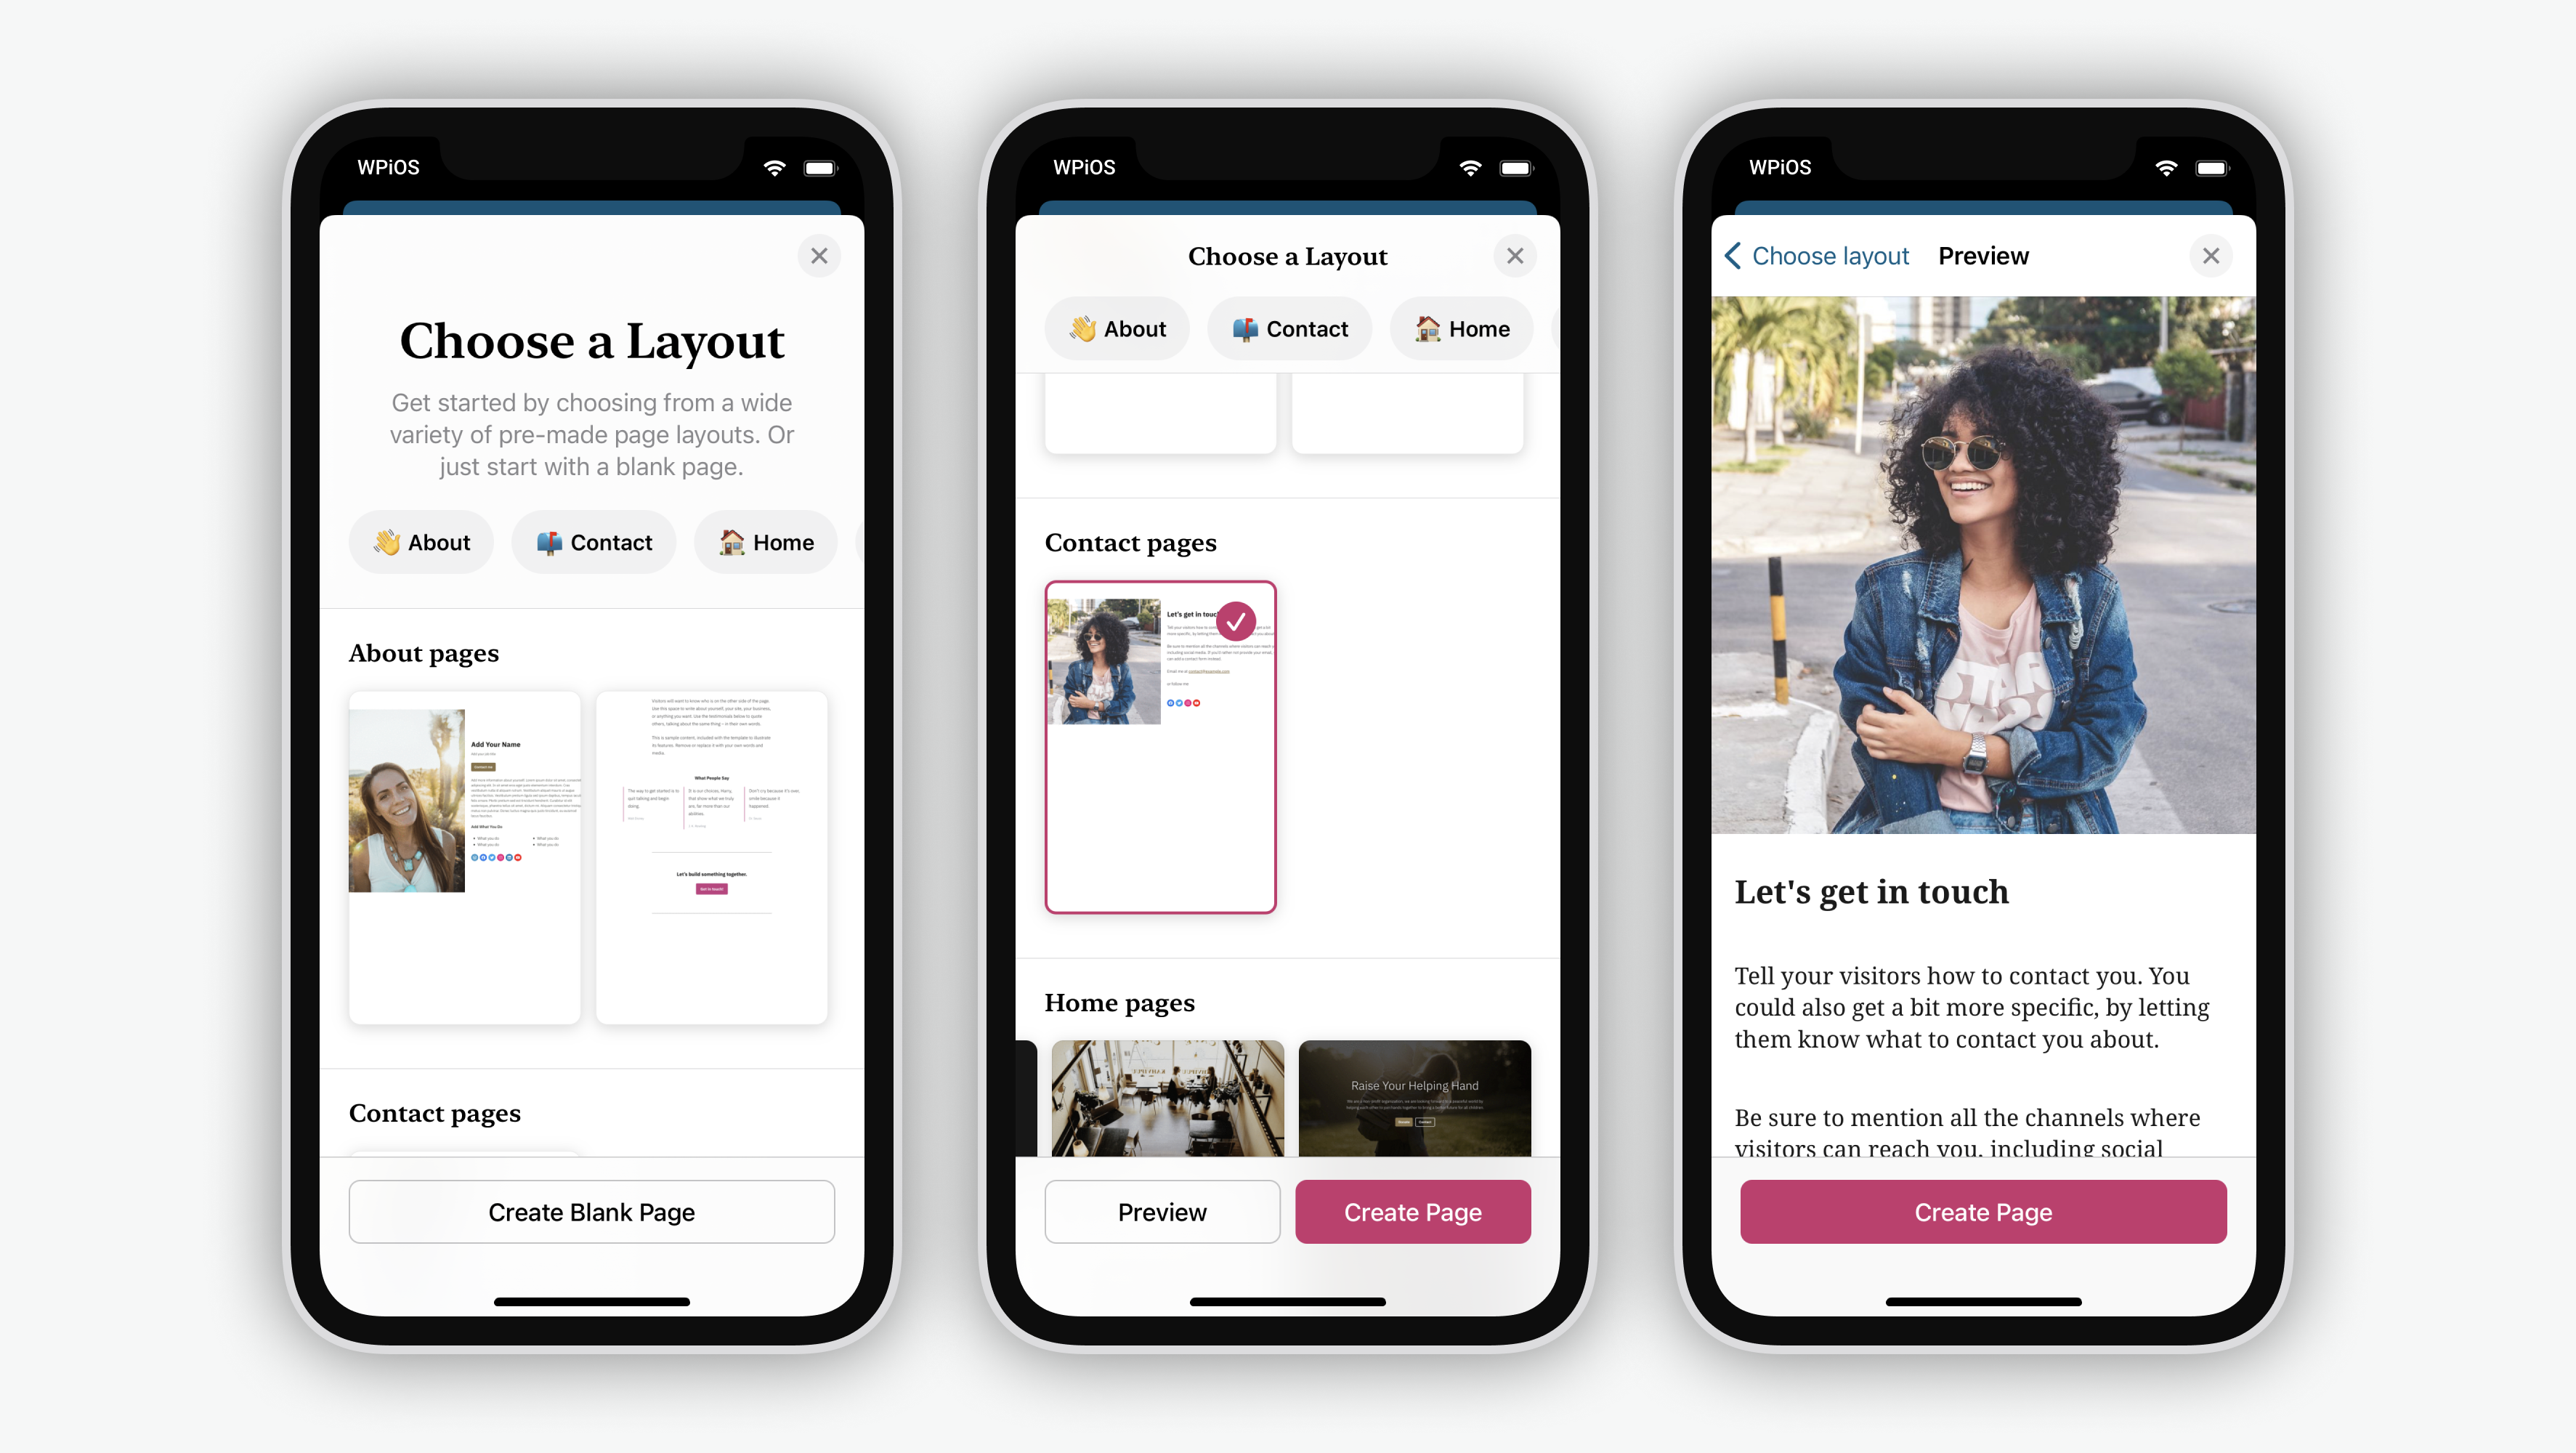
Once you find a layout that you’d like to try, tap it to select it. After you’ve selected a layout, you can either preview it or create a new page with the chosen layout.
Ready to try these new Starter Page Layouts? Be sure to update your WordPress app to the latest version. If you don’t have the app yet, download it for free, on both Android and iOS.
We’d love to hear your feedback on these new layouts. Reach out to us from within the app by going to My Site, tapping your photo on the top right, tapping Help & Support, and then selecting Contact Support.