
Publishing to WordPress from Bear Just Got Better
Sharing is a core part of the iOS experience, and WordPress is committed to helping people share their stories, products, or services freely and widely. So when the fine folks at Shiny Frog—makers of the excellent writing app Bear—asked for an easier way turn Bear notes into WordPress posts, we enthusiastically said yes. We’ve been working together to create a great publishing experience, and today Bear and WordPress both have app updates that incorporate this latest and greatest integration.
Go ahead, give it a try!

The Bear and WordPress apps work together seamlessly to turn your note into a fully-formatted blog post.
- Update your Bear and WordPress apps to make sure you’re using the latest versions.
- Open Bear, and tap the share icon at the top right of a note.
- Tap WordPress in the top row of options (learn how to enable app extensions on iOS).
- The WordPress app will open and prepare a new blog post with the contents of your note, complete with proper formatting of headings, links, formatting, lists, and even photos.
To automatically give your blog post a title, make sure your Bear note begins with an H1. You’re all set—the only thing left to do is publish.
How we did it
If you’re curious about the technical details: our mobile team updated the app to support TextBundle files shared from other apps. On Bear’s end, the app now knows WordPress for iOS supports TextBundle, and automatically shares notes in that format.
TextBundle is made for sharing plain text files that include attachments like photos, and since it’s built on an open standard, other developers can integrate their apps with it. If you’re an app developer looking to improve your WordPress publishing experience, you can start with Shiny Frog’s open source TextBundle library, the same one that’s used in WordPress for iOS.
Finally, if you try out this new integration, let us know what you think! Download the WordPress mobile app for iOS and Android.
Boost Visitor Engagement and Grow Your Mailing List with the Mailchimp Block
Keeping your visitors interested is the key to a successful website—and one great way to do that is with email. A smart email outreach plan piques peoples’ interest, keeps them engaged, and brings them back to your website.
To send emails, you need a mailing list, and Mailchimp is the list-building tool of choice for lots of folks. With WordPress.com’s new Mailchimp block, you can add a signup form to any post or page. Give visitors the opportunity to join your list wherever they are on your website.
Using the Mailchimp block
If your website is on WordPress.com or uses Jetpack (version 7.1 or higher), the Mailchimp block is already waiting for you in the block editor. Open a post or page, add a new block, and either search for “Mailchimp” or select it from the list of available blocks.


Once you’ve inserted the block into your content, you can customize the following aspects of your form:
- Placeholder text in the field for email address. Once your visitor starts filling out the form, this placeholder text will disappear.
- Text on the submit button.
- Terms of service disclaimer at the bottom. These terms and conditions are the contract between you and the subscriber.
- Success message text that will appear after visitors submit their email.
- Error message text if there was a problem in submitting the form.
First-time setup
The first time you add a Mailchimp block, you’ll need to to connect your Mailchimp account to your WordPress website and specify the mailing list that your new subscribers will join.
You will need:
- A Mailchimp account. If you don’t have one yet, you can sign up here for free.
- At least one list created on this account. Mailchimp has a good resource on that here.
Once you have a Mailchimp account, open wordpress.com/sharing, choose your site and select “Mailchimp” from the list of connections.
 Mailchimp connection details in the Sharing section.
Once you click “Connect,” you will be prompted for the login and password to your Mailchimp account. Once you’re logged in, you will be taken back to WordPress.com:
 Connection details after successful Mailchimp authorization.
After connecting your account, remember to select your Mailchimp list. You can read more about setting up your configuration options here.
Grow your audience with email
Email helps you build a relationship with your readers. Not sure what to send? Try:
- Sending updates about new posts or products.
- Sharing other interesting articles from around the web.
- Writing more personal updates.
- Expanding on your blog posts.
- Offering discounts or early access to premium content.
Forging an email relationship can turn a one-time visitor into a loyal follower or customer. And the people who trust you with their email addresses are often your biggest fans, so it makes sense to give them some extra goodies.
Build better landing pages
Email signups are also perfect for landing pages or “Coming Soon” splash pages. A landing page is a simple one-page website that serves only one purpose: to collect email addresses. Usually, it’s a placeholder for a fuller site to come, or a new product or service that will launch in the future. With a Mailchimp block, you can collect emails right on your landing page:
 Here’s a quick example of how easy it is to set up.
Collect the email addresses of interested visitors while you build your product or a larger site behind the scenes. Once your creation is ready to be unveiled, you can email your list to let them know.
You can use lots of different features to build and engage your audience — social sharing, blog comments, the WordPress.com Reader — and now you’ve got one more tool at your disposal!
Announcing Free .blog Subdomains
Over the last thirteen years or so, the number of sites on WordPress.com has grown — a lot. Every one of those sites gets a unique wordpress.com address. And since there are millions of sites created each year, it means the address you’d like isn’t always available.
Today, a whole new range of possibility opens up: free .blog subdomains.
What’s a subdomain?
Glad you asked! This site’s address is blog.wordpress.com. Here, wordpress.com is the domain and blog is the subdomain.
Say your name is Molly and you’re starting a food blog. The domain mollysfoodblog.wordpress.com — that is, the subdomain “mollysfoodblog” on wordpress.com — is already taken by someone. Or you’re starting a website to offer tech advice; but there’s already a site using techadvice.wordpress.com, drat!
Now you have more options: you can choose to use a free subdomain with a .blog address, like mollys.food.blog or advice.tech.blog. There’s a list of popular .blog domains we’ve reserved just for this:
- art.blog
- business.blog
- car.blog
- code.blog
- data.blog
- design.blog
- family.blog
- fashion.blog
- finance.blog
- fitness.blog
- food.blog
- game.blog
- health.blog
- home.blog
- law.blog
- movie.blog
- music.blog
- news.blog
- photo.blog
- poetry.blog
- politics.blog
- school.blog
- science.blog
- sport.blog
- tech.blog
- travel.blog
- video.blog
- water.blog
These .blog subdomains work just like the regular wordpress.com subdomains — they don’t expire, they’re free to use for the lifetime of your site, and you can always replace them with a custom domain at any time.
How do I get one?
First, create your new site. In the first step of signup, we’ll ask you about your goal for your site — select only the “Share ideas, experiences, updates, reviews, stories, videos, or photos” option. In our experience, the people who select this option generally find that a .blog subdomain fits their site well. Fill out the other fields as well, and click Continue.

Now, in the next step when searching for a site address, you’ll see a free option at the top of the list. We’ll suggest a .blog subdomain related to the terms you entered in the first step. For example, if you searched for “Tech Advice,” we might suggest advice.tech.blog as an address for your site.

Click Select next to the address you choose, and you’re all set,
Your new website and its perfect address are only a few clicks away. If you start a new site with a .blog subdomain, let us know in the comments! We’d love see what you create.
Customize Your WordPress.com Dashboard
We’re happy to announce new improvements to your WordPress.com dashboard for a more accessible and customized experience. From your desktop, you can now customize your dashboard by choosing one of our two new color schemes, Classic Bright for a fresh modern feel and Classic Blue as the standard you’ve known and loved. As part of our commitment to inclusive design, these new colors have been optimized for higher contrast and increased legibility with a contrast ratio of at least 4.5:1.
 Color
Color Grayscale
We’ll soon be introducing additional color scheme options that will continue our mission of a better more accessible web for everyone.
Here’s how to customize your color scheme:
- On your desktop, sign in to your WordPress.com account that you’d like to customize.
- Click your account avatar in the upper right corner.
- Select Account Settings
- Under Dashboard Color Scheme select an option

Have ideas for color schemes you’d like to see? Please comment below.
New Theme: Twenty Nineteen
We’re pleased to announce that Twenty Nineteen — the new WordPress default theme designed by Allan Cole and Kjell Reigstad — is available to all WordPress.com sites.

Twenty Nineteen was designed with simple but sophisticated typography and a pared-down, open aesthetic, making it a great foundation for a variety of websites. It also fully supports the new WordPress Editor, which allows you to create a wide range of content for your site.
Twenty Nineteen gives your featured images a bold treatment on posts and pages: the images cover the full width and height of the screen, along with a color overlay which can be changed in the Customizer.

Learn more about WordPress’s latest default theme here, or check out the demo site!
Now Available in the Mobile Apps: Revision History
The ability to load a previous version of a page or post is invaluable when you need to make a quick correction or compare your current revision to earlier ones. What about viewing your content’s revision history on the go? This can be a real life-saver, as we’re not always at our desktops. Well, we’re thrilled to announce that you can now review your content’s history and load revisions for both pages and posts directly from the WordPress mobile apps.
View History
The revision history of every page or post you’ve worked on is available right from the editor. Just tap My Sites → Site Pages or Blog Posts → any page or post → three-dots button → History.

The history list shows you the time each revision was created (organized by date), the author of the revision, as well as the number of additions and deletions for each revision. To view the content of each revision, tap it on the list.
Load Revision
If you’d like to continue working on an earlier version of your page or post, tap the Load button while viewing the content of a revision. You can view the content in either HTML or a visual format — just tap the three-dot menu and select HTML preview or Visual preview, respectively.

Send Feedback
The WordPress mobile apps are free and available for both Android and iOS devices. If you have any questions or feedback, reach out to our support team directly from the app — tap Me → Help & Support → Contact Us. If you’re a developer and would like to contribute to the project, learn how you can get involved.
WordPress Support Workshops for Women in the Asia-Pacific Region
Automattic wants to build a new web, and a new type of workplace. We want to deliver world-class 24/7 support to our users, and an innovative, exciting, and healthy work environment for our staff worldwide. As a part of this, we recruit from all timezones so that everyone has the freedom to choose their own work hours.
In Happiness in particular, we want to provide better support coverage in the Asia-Pacific (APAC) region, and our APAC recruiting efforts have included everything from advertising on social media and job boards to in-person networking at WordCamps and WordPress Meetups.
While we’ve hired some great Happiness Engineers, we discovered that the ratio of women applicants was dropping over time. As awareness of Automattic as a distributed employer has grown in the region, the number of applications from men has grown faster than those from women.
Given Automattic’s commitment to fostering diversity and inclusion, we brainstormed ways to reach women more effectively. This turned into a series of workshops on WooCommerce held for women in India and Singapore throughout 2018.
In 2019 we’ll take our message to a broader audience by offering an online workshop. This will let us reach women in many more countries and cities than we could ever visit in a calendar year. We’re partnering with Support Driven, an online community of support professionals, to promote support as a career for women who may have the relevant skills but haven’t applied for these roles.
In January 2019 we’ll launch the first online workshop for women in APAC focused on developing skills in WordPress support. The course will cover:
- Goals of great customer support
- Developing your own support philosophy
- WordPress troubleshooting
- Productivity tools
- Support as a career
By the end of the course, students will have developed a résumé and portfolio site on WordPress to share with potential employers.
Want to be notified about this and other upcoming workshops? Sign up here!
Photo by Elijah O’Donnell on Unsplash.
Setting Up Your Site on a Mobile Device Just Got a Lot Easier
Starting a new website is always exciting: you’ve chosen a topic, found the right name, and started building it on WordPress.com.
Now you may be asking yourself, “What’s next?” Well, when you create a site on the WordPress for Android or WordPress for iOS mobile apps, the answer just became a lot easier with the introduction of Quick Start, a new tool that guides you through the setup process.
How Quick Start works
After you create a new site on your WordPress app, you’ll see a prompt asking if you want some assistance setting it up. Tap Yes! and you’ll find Quick Start: a short list of to-do items that will set you on the path to success.

With Quick Start, you’ll be able to…
- View your site from within the apps.
- Select a new theme.
- Customize your site.
- Create a new blog post.
- Set up your sharing preferences.
- Follow new sites in the WordPress.com Reader.
These are all tasks that will help you start on the right foot. Exploring these options won’t take very long, but once you’ve gone through the list you’ll have a website ready to welcome its first visitors — and all the pieces in place for future growth and success.
Available now
Quick Start is part of the WordPress for Android app (version 10.8 or higher) and WordPress for iOS (version 11.1). If you’ve got an iPhone, iPad, or Android device and have been thinking of launching a new site, this is the time to take the plunge!
A New Way to Manage Your Pages on the WordPress Mobile Apps
We’ve made a small change to the WordPress mobile apps to make it easier for you to navigate and edit your pages. In previous versions of WordPress for iOS and Android, your pages were ordered by the date they were created as opposed to what your actual page hierarchy looks like on your website. Users told us they found it difficult to find the page they were looking to edit, so we’ve now updated this section to match the layout of your site.

Here’s how to try it out
First, make sure you’ve updated your WordPress app to the last version. Open the app, go to the My Site section, select a site and then select Site Pages.

If a page has one or more child pages, the new layout represents the hierarchical view using an indentation on the left. If a page is a top level page, it won’t be indented.

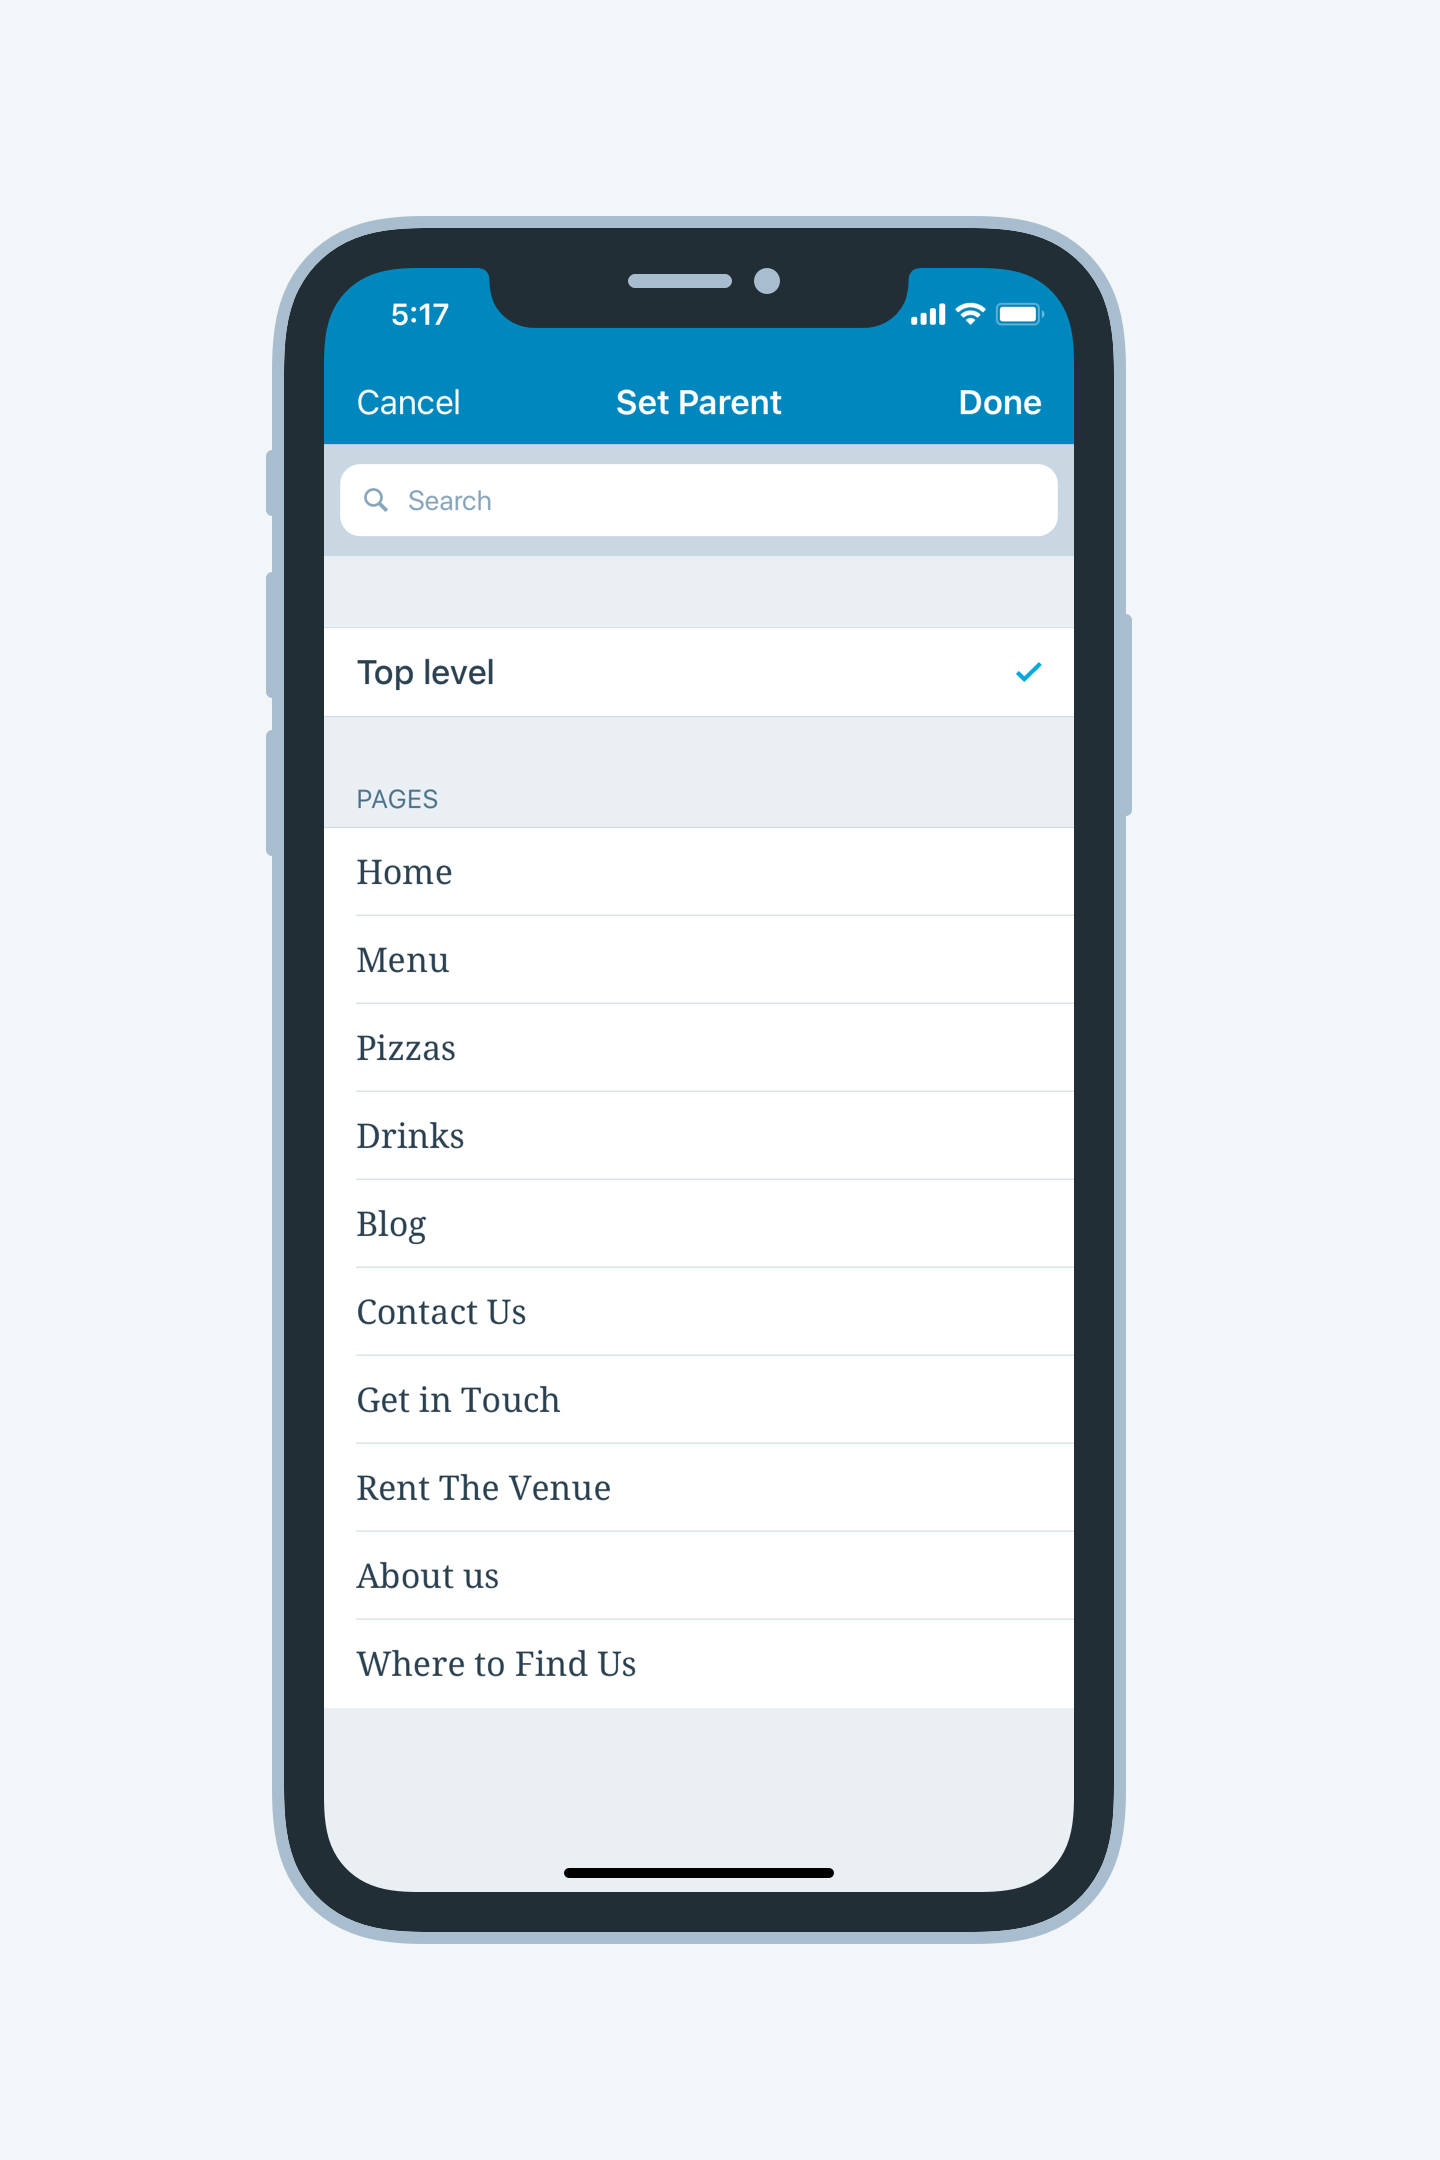
Set a parent page
To set a parent page or a top level page, click on the [3 dots menu] on the right of the page you want to edit, then select Set Parent. The app will show you the list of the available pages and the Top level option. You can use the search bar at the top to easily find the page you are looking for. Select the option you require and tap the Done button.
Send feedback
The WordPress mobile apps are free and available on both Android and iOS. If you have any questions or feedback, reach out to our in-app support team by tapping Me → Help & Support → Contact Us. If you’re a developer and would like to contribute to the project, learn how you can get involved. Enjoy!
Introducing Activity
Knowing what’s going on behind the scenes of your site is key to engagement and security. Who published a post? What comments need to be approved? When was a plugin activated or deactivated? What images were added to a specific page?
Now, there’s a new tab in WordPress.com where you can see all your site’s activity outlined in an organized, readable way: It’s called Activity, because monitoring your site should be as simple as possible.
Activity shows you a chronological list of all the changes and updates to your site. It’s useful for site owners who want to keep an eye on the big picture of their site, as well as for admins on larger sites with multiple contributors.

Activity shows you things like:
- Published or updated posts and pages.
- Comment submission and management activity.
- Settings and options modifications.
- Login attempts by registered site users.
- Plugin installations, updates, and removals.
- Theme switches, installations, updates, and deletions.
- See the complete list of activities for WordPress.com and Jetpack sites.
Head to Activity right now, and you’ll be able to see your site’s 20 most recent changes and updates. On WordPress.com or Jetpack sites with a paid plan you’ll see events from the last 30 days, and if you have the Business or Professional plan respectively, you’ll see events from the last year.
All sites with a paid plan have the added ability to filter activities by type and time range so you can quickly find the information you’re looking for.

To keep things scannable, sequential events of the same type are grouped in a single item — expand it to see details for all of the collected actions.

Activity is also a great place for Jetpack subscribers to investigate site downtime or bugginess. See what changes happened around the time of the issue, and use the details to focus your troubleshooting and get back up and running, fast.
You can also view your list of activities on the WordPress mobile apps.
Stay up to date on the latest theme and plugin updates
For sites with plugins and uploaded themes, keeping them up to date and knowing what was updated when are key to security and stability. Activity not only shows you all the details in one place, but lets Jetpack and WordPress.com Business plan subscribers update themes and plugins directly from the Activity tab.
We’re constantly striving to be better
Give Activity a try on your sites and let us know if you have any feedback — we’d love to hear it! Please leave a comment below or open an issue in our GitHub repository.